Showing posts with label Chicken. Show all posts

Thursday, September 17, 2020

Creamy Cheddar Chicken over Rice

 This is one of my honey's all time favorite dishes.  Definitely a comfort meal at it's best, and ready in less the 30 minutes.  Yes, you can make this following the recipe in a slow cooker, set for 4 hours on low, but it's so easy on the stove top, why not?  I hope this becomes one of your favorites too!


Monday, August 31, 2020

Potato Chip Crusted Chicken Breasts

     We LOVE breaded chicken in our house!  This recipe calls for something a little different...potato chips!  Not only do the potato chips give the chicken a little extra moisture, they are also preseasoned (salted).  One very important tip when breading chicken or any type of protein, season each layer.  Do not only season the protein.  This will enhance the flavor of the layers and the protein itself.

    I made this as a Chicken Parmesan style with melted provolone, but it's great on its own, in a sandwich, or a side.  We enjoyed it with pasta with marinara sauce and an aglio e olio pasta.  Perfection!


Friday, August 21, 2020

Quick Cream of Chicken Soup


    Lately I've had a taste for cream of chicken soup.  When getting lunch ready for the kids, I will make my lunch while they are eating.  Opening a can of soup is quick and easy, but today I wanted to make my own using up some of the leftover chicken from the Lemon and Fresh Herb Roasted Chicken.  

    You will LOVE this recipe!  I pulled this soup together with onhand ingredients in about 15 minutes.  This is so thick and creamy, it would be great over pasta or rice, with veggies and mashed potatoes, or simply on its own.  Adding in some broccoli or peas would also be delicious!

Recipe serves 2.

Ingredients:

  • 3 tbsp butter
  • 3 tbsp flour
  • 2.5 to 3 cups milk or half and half, I used a combination of both
  • 2 tsp each of garlic and onion powder
  • salt and pepper
  • diced leftover chicken
  • drizzle of lemon juice

Directions:

  1. Add butter to a medium pot on medium high heat.  When the butter is melted, whisk in the flour.  Whisk well to combine all of the flour with the butter.  
  2. Once the butter and flour are slightly browned, whisk in 1 c. of milk.  Continue to whisk until all lumps of flour are gone.  Add more milk, whisk to combine.  Continue to add milk until you have your desired thickness.
  3. Stir in diced chicken, adjust seasonings, and drizzle in lemon juice.  Lunch is ready!!  Enjoy!!

Lemon and Fresh Herb Roasted Chicken

    I’m always thinking of easy meals to make that are dairy and nut free free. I know we have all gotten frustrated and it gets hard to find or offer variety when there are allergies in the house. For family meals I like to make things everyone can eat so no one feels “different or slighted.” We had easy lemon and fresh herb roasted chicken for dinner with a garlic and oil pasta. It was a hit!! It was a perfect accompaniment to the pasta, but mashed potatoes would be terrific as well.

    This recipe is super simple and takes very little effort. I used bone in chicken breasts because the bone adds so much flavor and tends to keep the breasts juicier. In a large baking dish, I layed out the chicken, sprinkled it with salt and pepper, fresh thyme, chopped fresh rosemary, garlic powder, and lemon slices. Drizzled everything with oil, put it in the oven...done! You now have 40-45 minutes to get other things done.

    I'm thinking of trying this recipe for a whole roasted chicken. Placing lemon slices under the skin and in the cavity. I'll let you know how it turns out!

This recipe serves 4 large portions.

Ingredients:

  • 4 large bone-in chicken breasts, skin on
  • salt and pepper
  • 4 lemon slices
  • 3 tsp fresh thyme
  • 3 tsp fresh rosemary, chopped
  • 3 tsp garlic powder
  • olive oil

Directions:

  1. Preheat oven to 400 degrees.
  2. Arrange chicken in a large baking dish, season with salt and pepper, garlic powder, fresh thyme and rosemary. Place a slice of lemon on each chicken breasts. Drizzle chicken breasts with olive oil.
  3. Place in the oven for 35-40 minutes. Skin will begin to brown and crisp. Check internal temperature of the chicken. It needs to be 165 F. The pan juices from the roasting serve as a perfect "gravy" over the chicken, and great for basting the chicken to keep it moist.
  4. Once the chicken is ready, dinner is set! Serve with an aglio e olio pasta or mashed potatoes. Enjoy!

Wednesday, August 12, 2020

Balsamic Glazed Chicken Breasts with Creamy Onion Gravy


    Once in a while I really crave some comfort food.  The other night I made chicken and gravy with some mashed potatoes, green beans and bacon. This marinade is versatile and it can also be used with pork as well.  This would be a great base for a sweet and tangy BBQ pork roast in the slow cooker.  Feel free to also use with boneless chicken thighs or tenders.  

    I didn't marinate the chicken for very long, just for about 20 minutes.  This could go for a little longer if you'd prefer, but I roasted the chicken breasts in the marinade to enhance the flavor.  Originally I was just going to make some "grilled" onions to have on top, but knowing we were having mashed potatoes with dinner, gravy just seemed that much better.  Gravys are very easy to make.  For a simple and quick gravy, add 2 tbsp butter to your skillet, once the butter is melted, add an equal amount of flour.  Whisk to combine.  Once the flour is incorporated to the butter, and it begins to form small bubbles, add either broth and/or milk.  Add about 1 c. at a time to determine the thickness of the gravy you like.  Whisk again until well combined.  Season your gravy and your gravy is ready to go!

Ingredients:

Glaze:
  • 3 tbsp. balsamic vinegar
  • 2 tbsp. honey
  • 2 tsp. dried thyme
  • 1/4 c. olive oil
  • 1 clove garlic, grated
  • salt and pepper
Combine the ingredients into a small bowl.  Whisk well to combine. Set aside.

Chicken:
Preheat oven to 400 degrees.  Place chicken pieces into a large baking dish.  Pour glaze over the chicken.  Set aside for 20 minutes while the oven is preheating.  Roast chicken for 35-40 minutes, or until chicken reaches an internal temperature of 165 degrees.  While the chicken is in the oven, prepare the onion gravy.

Creamy Onion Gravy:
  • 2 tbsp butter
  • 1 medium onion, halved and sliced into thin slices
  • 2 tbsp flour
  • 1 c. milk, more if needed
  • 1 packet of onion soup mix
  • salt and pepper
Add butter to a large skillet on medium high heat.  Once the butter has melted, add the onions.  Saute until translucent and they begin to brown.  Whisk in flour to the butter and onions.  Continue to whisk as the flour begins to bubble and brown.  Whisk in milk and stir to remove any lumps from the flour.  Continue to add more milk (1/4 c. at a time) as the consistency of the gravy thickens.  Once the mixture is well combined and slightly thick, add the onion soup mix, salt and pepper.  Stir until well combined.  Allow to thicken once again.  Stir.  If needed, add a little more milk.  Stir.  (If you want to keep this dairy free, use stock or broth or dairy free milk.  Water will work too, but not as flavorful.)  You will want the gravy to coat the back of a spoon.

Serve with mashed potatoes, baked or roasted potatoes, green beans (any veggie), rice, or pasta.  Enjoy!!

Balsamic Glazed Chicken and Pork Chops

Saturday, August 8, 2020

Slow Cooker Chicken Alfredo with Cheese Tortellini


    Has it ever been "that kind of day," and you just don't feel like putting a lot of effort into making dinner? .  Or the weather just too hot to turn on the oven?  Around our house, it was "that kind of day," and I didn't feel like putting in a lot of effort into dinner, but I knew I was hoping to make some comfort food.  So, I turned to the slow cooker and figured that would be a great compromise.  

    I opted for Chicken Alfredo since it was just David and I home for dinner that night.and we didn't have to worry about any dairy free options.  This doesn't need to cook for that long, so I started the slow cooker that afternoon with the chicken breast and alfredo sauce.  You have the option of cooking the tortellini in the slow cooker 15 minutes before serving, or do what I did and cook them separately and toss everything together before serving.  I "doctored up" the jarred Alfredo sauce I used added grated garlic, a little salt and pepper, onion powder, dried parsley, half and half, and shredded parmesan.  

    Extremely easy dinner, and most importantly stress free!  Sometimes you just need that kind of dinner.  Serve with a salad and bread!  

This recipe serves 4.

Ingredients:

  • 2 lbs. chicken breasts or 3 - 4 large chicken breasts
  • 2 jars Alfredo sauce
  • 2 cloves of garlic, grated
  • 2 tsp. onion powder
  • 1 tbsp. dried parsley
  • 1/2 c. half and half
  • 3/4 c. shredded parmesan
  • salt and pepper
  • 1 20oz. package of cheese tortellini

Directions:

  1. Trim any excess fat from the chicken breasts.  Add to slow cooker.
  2. In a medium size bowl, combine 1 jar of the Alfredo sauce, garlic, onion powder, parsley, salt and pepper, and parmesan.  Pour the 1/2 c. of half and half into the jar from the sauce, replace the top, shake to get any sauce left in the jar, and then pour into the bowl.  Mix well.  
  3. Pour mixture over the chicken to coat.  Set the slow cooker for 5 hours.  Once the chicken is cooked, either shred or cut into chunks.  Keep warm in the slow cooker.
  4. Either cook the tortellini to package directions or add to the slow cooker.  If cooking the tortellini in the slow cooker, add the 2nd jar of sauce and stir.  Set the slow cooker to simmer and cook for 10 minutes.  If cooking separately, add the second jar of sauce to the slow cooker, stir to combine, then add the tortellini once cooked and drained.
  5. Serve with a simple salad and crusty bread.  Enjoy!
Note: This recipe would also be good served over a fettuccini or or angel hair pasta.

Saturday, July 11, 2020

Chipotle Chicken Burgers with Chipotle Mayo


      I am always wanting to try new things and new dishes for my family.  Sometimes I will use my husband and I as guinea pigs when all of the kids aren't home (with their other parent) to determine whether or not the kids would like certain dishes.  This happens to be one of those dishes.  Not that they don't like burgers, are you kidding?  Our kids LOVE burgers, but these burgers are made with ground chicken, something foreign to them.  Yes, we've had turkey burgers and ground turkey in other dishes, but they've never had ground chicken.  These burgers are nicely seasoned and not too spicy despite the chipotle peppers, so we think they will really like them.  Hey, at least we really did!  

    When making burgers with other ground meats other than ground beef like ground turkey or ground chicken, you will need to be sure to add breadcrumbs and eggs.  There is not a lot of fat in these types of meat and won't hold together as well without the egg and breadcrumbs.

    I've seen similar recipes that call for 2 to 3 chipotles, diced, but holy cow, that's going to be an extremely spicy burger!  I used half of a pepper, and removed the seeds before dicing it.  That was a perfect amount of spice for us because I made a chipotle mayo to top the buns.  I used the other half of the pepper in the mayo.

    Quick tip!  When handling ANY spicy pepper, wear plastic gloves first.  I can't tell you how many times I've not worn gloves, diced spicy peppers, and then later rubbed my eyes...OUCH!!!!  Don't ever try it.  Trust me on this one.

    These burgers would be great served along with fries, a creamy coleslaw, creamy cucumbers (pictured above), Taco Pasta Salad, Mexican Street Corn Pasta Salad, or chips.  

This recipe makes 5 big burgers.  When I make this for all of us, I will add another pound of ground meat, and adjust ingredients accordingly.

Ingredients: 

Burgers

  • 2 lbs. ground chicken
  • 1/2 canned chipotle pepper, seeds removed and diced, include a little of the adobo sauce
  • juice from 1/2 lime
  • 2 eggs
  • 1/4 c. chopped fresh parsley
  • 1 1/2 c. breadcrumbs
  • salt and pepper
Mayo
  • 1/2 canned chipotle pepper, seeds removed and diced, include a little of the adobo sauce
  • 1/2 c. mayo
  • juice from 1/2 lime
  • 2 tbsp chopped fresh parsley
  • salt and pepper

Directions:

  1. In a large mixing bowl add all of the ingredients for the burgers.  Using a wooden spoon, stir until thoroughly combined.  If the meat mixture feels extremely loose add a little more breadcrumbs until you can form a patty and it won't fall apart.
  2. Line a baking sheet with parchment paper.  Set aside.  To form the burgers, make a ball of the meat mixture about the size of a baseball, slightly larger.  Flatten to a round patty about 3/4 in. thick.  Using a thumb, put an indentation into the center of the patty.  This will allow the burgers to rise evenly and not form into a baseball while cooking.  Set burger patties on the baking sheet.  Once all of the burgers are made, cover with foil and place in the fridge.  These burgers can be made early in the morning and grilled at dinner time.  It's better to grill these burgers when they are cold and not at room temperature.
  3. Grill or broil until internal temperature reaches 165 degrees F.
  4. While the burgers are grilling, make the mayo.  Combine all of the ingredients for the mayo in a small bowl.  Whisk to combine.  Set in the fridge until ready to use.
  5. Serve burgers on toasted potato rolls, pretzel buns, with the chipotle mayo, lettuce, sliced onion, tomatoes and cheese.  Enjoy!!

Sunday, June 28, 2020

Easy Orange Chicken


Easy Orange Chicken with Chicken Fried Rice and Homemade Egg Rolls

    Sure it's extremely quick and easy to open a bag of frozen orange chicken or order it for takeout, but there is something rewarding about making it at home.  Because we are a big family, I usually buy the large family size packages of chicken breasts from Aldi.  Each package typically contains 4 large or 5 medium size chicken breasts.  When making a meal like Orange Chicken with Chicken Fried Rice, I will use the entire package of chicken, but the good thing is that I get two meals or dishes out of it!  

    I will warn you that this recipe can get time consuming, but make it in stages.  This will definitely help.  I will cut the chicken into 1 inch chunks the night before.  Put them in a large freezer bag or air tight container and store in the fridge.  In the morning or early afternoon, I will make the coating for the chicken.  Combine the chicken and allow it to sit in the coating in the fridge.  Then about an hour or so before dinner, I will start to fry the chicken.  I have the oven on a lower temperature to keep the chicken warm after frying it.  
  
    Yes, you can definitely make the orange sauce from scratch, but after making the chicken, I get a little lazy and open two jars of orange sauce and heat it.  😃  We serve the chicken and sauce separately.  Everyone can add the amount of sauce they would like and this makes it easier to store leftovers so the chicken doesn't get soggy in the sauce.  Serve with plain white rice, brown rice, or fried rice.  Our preference...fried rice.

This recipe will serve 6 to 8 with leftovers.

Ingredients:

  • 2 to 3 large boneless, skinless chicken breasts, cut into 1 inch chunks
  • 3/4 c. corn starch
  • 1/4 c. flour
  • 1 tsp. baking powder
  • 1 tsp. baking soda
  • salt and pepper
  • 2/3 c. water
  • oil for frying
  • 2 bottles of Orange Chicken Sauce

Directions:

  1. Cut chicken into 1 inch or bite size pieces.  Feel free to do this ahead of time.
  2. Whisk together corn starch, flour, baking powder, baking soda, salt and pepper.  Add water slowly to combine.
  3. Add chicken to the flour mixture.  Coat chicken on all sides.  You can prepare in advance, and can place in the fridge for up to 4 hours.
  4. When ready to fry, heat 1/2 inch of oil in a large skillet.  Preheat the oven to 300 degrees.  Prepare a pan to put chicken after it's fried.  Cover a baking sheet with foil.  Place a cooling rack on the foil covered baking sheet.  This will allow excess oil to drain after frying.  After each batch of chicken is fried, place it on the cooling rack and put in the oven to keep warm.  
  5. To test the oil if it's ready, dip the end of a wooden spoon into the oil.  If bubbles form around the spoon, the oil is ready.
  6. Add chicken pieces one at a time to the hot oil.  Be sure not to crowd the skillet.  This will reduce the oil temperature and cause the chicken to stick together.  The chicken will cook quickly in the hot oil.  Flip once to brown both sides of the chicken.  Remove to cooling rack and season with salt.  Place the chicken in the oven and start to fry the next batch.  Continue this process until you are finished.
  7. While the chicken is staying warm in the oven, heat the Orange Chicken sauce in a separate pot.
  8. Serve with white or brown rice or fried rice.  You may choose to combine both the chicken and the sauce, but we prefer to serve them separately.  ENJOY!!
NOTE: If you keep the chicken and sauce separate when serving, keep them separate for leftovers.  The chicken will not get soggy.

Chicken Fried Rice


Chicken Fried Rice with Orange Chicken and Turkey Egg Rolls

    It's nice to know that my kids prefer my Orange Chicken, Chicken Fried Rice and Egg Rolls to Chinese takeout.  It's a rewarding experience for me to make this for my family because I know they really enjoy it.  This Chicken Fried Rice is extremely quick and easy to make, and what I like best about making it at home, I get to control the salt.  Also, not everyone in our family likes eggs, so I scramble up the eggs separately.  Those who like eggs may add it to his or her individual plate.

    I often use fried rice as a way to incorporate veggies that we have on-hand, something I can use up from the freezer or fridge.  I've used carrots, onions, corn, broccoli, and peas.  The recipe pictured above includes carrots, onions, corn, and broccoli.  Cauliflower or mixed veggies would also be good in this dish.

This recipe serves 6 - 8.

Ingredients:

  • 2 tbsp sesame oil, you may also use olive oil
  • 1 clove of garlic, grated
  • 1 small onion, diced
  • 3/4 c. baby carrots, diced
  • 2 chicken breasts, diced into small pieces
  • 3 tbsp soy sauce
  • 1 c. frozen corn or peas, for this recipe I used leftover corn from the cob
  • 1 pkg. chopped frozen broccoli
  • 2 eggs, scrambled
  • 2 green onions, diced for garnish
  • salt and pepper

Directions:

  1. Heat sesame oil in a large skillet or wok.  Add grated garlic, onions and carrots.  Saute for 5 minutes.  Veggies will brown a little.  Season lightly with salt and pepper.
  2. Add chicken.  Saute for 10 minutes on medium high heat.  Stir frequently.  Add soy sauce.  Stir to combine.
  3. Add broccoli, corn or peas.  Combine.  Adjust seasonings, adding more soy sauce if needed.  Turn down the heat to low.  Allow to cook for another 5 minutes to finished cooking the broccoli.
  4. Scramble eggs in a separate skillet. If your family likes eggs, feel free to add eggs to your fried rice.  We serve ours separately.
  5. Before serving, sprinkle green onions on top of the fried rice.  Serve and ENJOY!

Monday, May 25, 2020

Hawaiian Chicken Kabobs with BBQ Dipping Sauce

    Emma has been asking for quite some time to make this recipe!  The girl LOVES pineapple.  She really likes pineapple pizza.  When we have "Make Your Own Pizza" nights for dinner, her go to pizza is diced ham and pineapple.  I am so blessed to have children that are not picky eaters.  I truly believe that it is in part our doing that we don't have picky eaters.  The children are told that they need to try everything that is served for dinner that night.  There is always plenty for them to eat on the table if there is something they try that they don't like, but we want to expose them to new things and we ask that they try whatever it is that is new.  9 times out of 10 they like what they try so we add it to our repertoire.  These kabobs are a perfect example.  Not everyone likes peppers, so if they don't like the pepper, they have the chicken and pineapple to eat, and oftentimes someone else will take the peppers the other one didn't eat.  Works out perfectly!


    When we serve the kabobs for dinner, we take them off of the skewer and serve.  This what no one gets poked with the tip, and makes it easier for the kids to eat and not have to struggle with the skewer.  

    I will often prepare these in advance, after marinating the chicken in the hawaiian teriyaki sauce for a couple of hours.  You can save the sauce to use to baste the kabobs while they are cooking on the grill.

This recipe will serve 6.

Ingredients:

  • 3 large chicken breasts, cut into 1 in. pieces
  • 1 15 oz. can diced pineapple with juice
  • 2 green peppers, cut into 1 in. pieces
  • 14 skewers
  • 1/2 c. soy sauce
  • 1/2 c. olive oil
  • 2 tbsp honey
  • 1 tsp ginger, ground
  • 1 clove garlic, grated
  • salt and pepper

Directions:

  1. Add pineapple juice from the can of diced pineapple, then soy sauce through salt and pepper into a large bowl.  Whisk to combine.  Add chicken pieces to bowl.  Marinate for about 2 hours. 
  2. While the chicken is marinating, cut the green peppers into 1 in. pieces.  
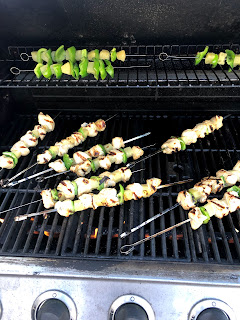
  3. Make kabobs.  There is no set way to make the kabobs, just be sure to alternate between chicken, pineapple and peppers, pictured above.  We had 5 pieces of chicken on each skewer, but 4 would be just fine.
  4. While you are preparing the kabobs, if you will be serving right away, preheat the grill.  You can make the kabobs in advance and store, covered in the fridge until you are ready to grill.  
  5. Place kabobs on the heated grill.  Rotate kabobs every 5 minutes or so.  This will allow for even cooking and grill marks on the chicken, et al.  We did have a few kabobs that were only peppers and pineapple.  I didn't grill them on the direct heat, but placed them in the rack above.  This allowed them to heat through, but not cook that much faster than the chicken.  
  6. Use the remaining marinade the baste the chicken during cooking.  Be sure to allow marinade to cook on the kabobs after basting due to the raw chicken juices.  Save some to make the BBQ Dipping Sauce.
  7. We didn't have any left to make a BBQ dipping sauce, but if you do, you MUST cook it because there was raw chicken in it.  To make the BBQ Dipping Sauce combine 1/2 c. ketchup, 1/2 c. BBQ sauce, marinade (if you don't have marinade add 1/4 c. soy sauce and 2 tsp. lemon juice and 1 tsp honey) to a small sauce pot.  Bring to a low boil.  Stir well to combine.  Reduce heat to a simmer.  Simmer for 5 to 10 minutes to thicken.  Serve as a dipping sauce on the side with the kabobs.  


Hawaiian Chicken Kabobs, BBQ Dipping Sauce, and Teriyaki Pasta Salad

Rotisserie Chicken and Chicken Marinade

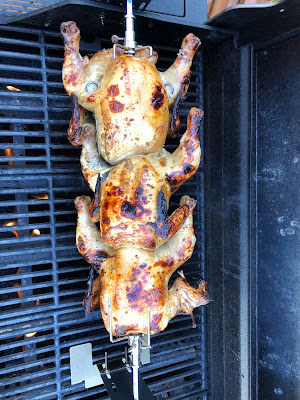
Just about a year ago now, the kids and I got David a rotisserie for either Father's Day or his birthday.  I can't remember which, it was so long ago...haha!  We were joking about using it earlier in the week last week, and we figured since we had three fryers in the freezer, it would be a good idea to pull out the rotisserie and try it!  When I was growing up, that's really the only way I remember my dad grilling whole chickens, on the rotisserie.  Once in a while he'd try a different method, but rotisserie was his go to method.  He still uses it to this day!  The taste of it brought me back to when I was a kid, the three of us enjoying dinner on our back patio, listening to the sounds of our neighbors argue while we chowed down on chicken, macaroni pasta salad and iced tea.  Maggie, our black Schnauzer mix, was running around the backyard chasing squirrels.  Those were the days!  Bringing us back to my family of six and three birds later...holy cow that was good!  I had the chickens resting comfortably in a marinade for about 8 hours, rotating them every couple of hours to bring as much flavor as possible.  I can see you're already salivating, so I better share my recipes with you.  Let's go through the marinade first, since that's where most of the work is done.  You can definitely use this marinade for any type of chicken, it doesn't have to be used solely for a whole chicken.  This would be great with chicken breasts, thighs, legs, and feel free to bake the chicken if you don't have a grill.

Chicken Marinade (the recipe is written for a whole chicken)

Ingredients:

  • 1 c. olive oil
  • 1/2 c. soy sauce
  • 1/2 c. white wine vinegar
  • 1 tsp red pepper flakes
  • 2 cloves garlic, grated
  • 1/2 c. lemon juice
  • 1/2 c. honey
  • 1 tsp. thyme, dried
  • 1 tsp. oregano, dried
  • 1 tsp. paprika
  • salt and pepper
  • 1 -2 whole chicken(s), I made three because they were small and we are big eaters!

Directions:

  1. Add ingredients in a large metal or glass bowl.  Whisk until well combined.  
  2. Trim any excess skin or unnecessary parts of the chicken.  Place chicken carefully into the bowl.  Cover with plastic wrap.  Place in the refrigerator on the bottom shelf, if possible, for 2 to 24 hours.  Rotate chicken every couple of hours to develop the flavors. 
    Chicken is marinating.

  3. Remove chicken and you are ready to cook!
*Note: Remember, you can use this marinade for any type of chicken you'd like.  It's versatile.  

Are you ready now for the rotisserie part?  This is super easy!  All you have to do is place your chicken .  

Place your marinated chicken on the rotisserie.  Attach it to the grill...let it spin!  You'll have to check your chicken for doneness, but no worries!  Just be sure to have your handy kitchen thermometer ready to check various parts on the chicken.  You'll want to check the legs as well as the breasts.  They don't often cook at the same speed.  Your chicken is done when all sections read 165 degrees.


Time for dinner!