Showing posts with label Side Dishes. Show all posts

Wednesday, August 26, 2020

Roasted Southwest Potatoes and Broccoli


    Roasted Southwest Potatoes and Broccoli are a great addition to your meal, not only on Taco Tuesdays, but any day during the week.  I made these as a side for our Popcorn Chicken Wraps, but the would be delicious with grilled chicken, steaks, pork chops, or even burgers.  

    We had less than a half bag of golden potatoes, and I knew I'd have to stretch that for the 6 of us.  Time to look in the freezer, ooh!  Broccoli!  The kids love broccoli and this dish is a great way to incorporate veggies into your dinner.  Using a simple mix of taco seasoning, it gives this dish a southwest feel.  One suggestion is to par cook the potatoes, this is ensure that the potatoes are not hard when they come out of the oven.  How many times do you roast potatoes and the come out hard?  Now, you have a quick tip to prevent that from happening.

These potatoes would also be good for a breakfast hash with scrambled eggs, sunny side up eggs, or even in a breakfast burrito!

This recipe will serve 6.

Ingredients:

  • 1.5 lbs golden potatoes or red potatoes, diced into cubes
  • 1/2 medium onion, diced
  • 1 bag frozen broccoli
  • 1 jalapeƱo, seeded and diced
  • 2 tsp. cumin
  • 2 tsp. garlic powder
  • 1 tsp. chili powder
  • 1 tsp. paprika
  • salt and pepper
  • olive oil

Directions:

  1. Dice the potatoes into cubes.  Add to a large pot.  Add water to cover the potatoes and season with salt.  Cover.  Heat water to boil.  Once boiling, turn the heat to simmer for 5-10 minutes.  Drain and return to pot.  Set aside.  This can be done in advance.
  2. Preheat oven to 400 degrees.  Line a medium baking sheet with foil.  Add onions, jalapeƱos and spices to the pot.  Add in 2 to 3 tbsps of olive oil.  Stir to combine.  
  3. Spread broccoli evenly on baking sheet.  Sprinkle a little olive oil on the broccoli.  Pour the potato mixture onto the broccoli and toss gently to combine.
  4. Place in the oven for 30 minutes.  Veggies will begin to brown slightly and flavors will come together!  Ready to serve!  Enjoy!!

Saturday, August 1, 2020

Lemon, Tomato, and Basil Orzo Pasta Salad


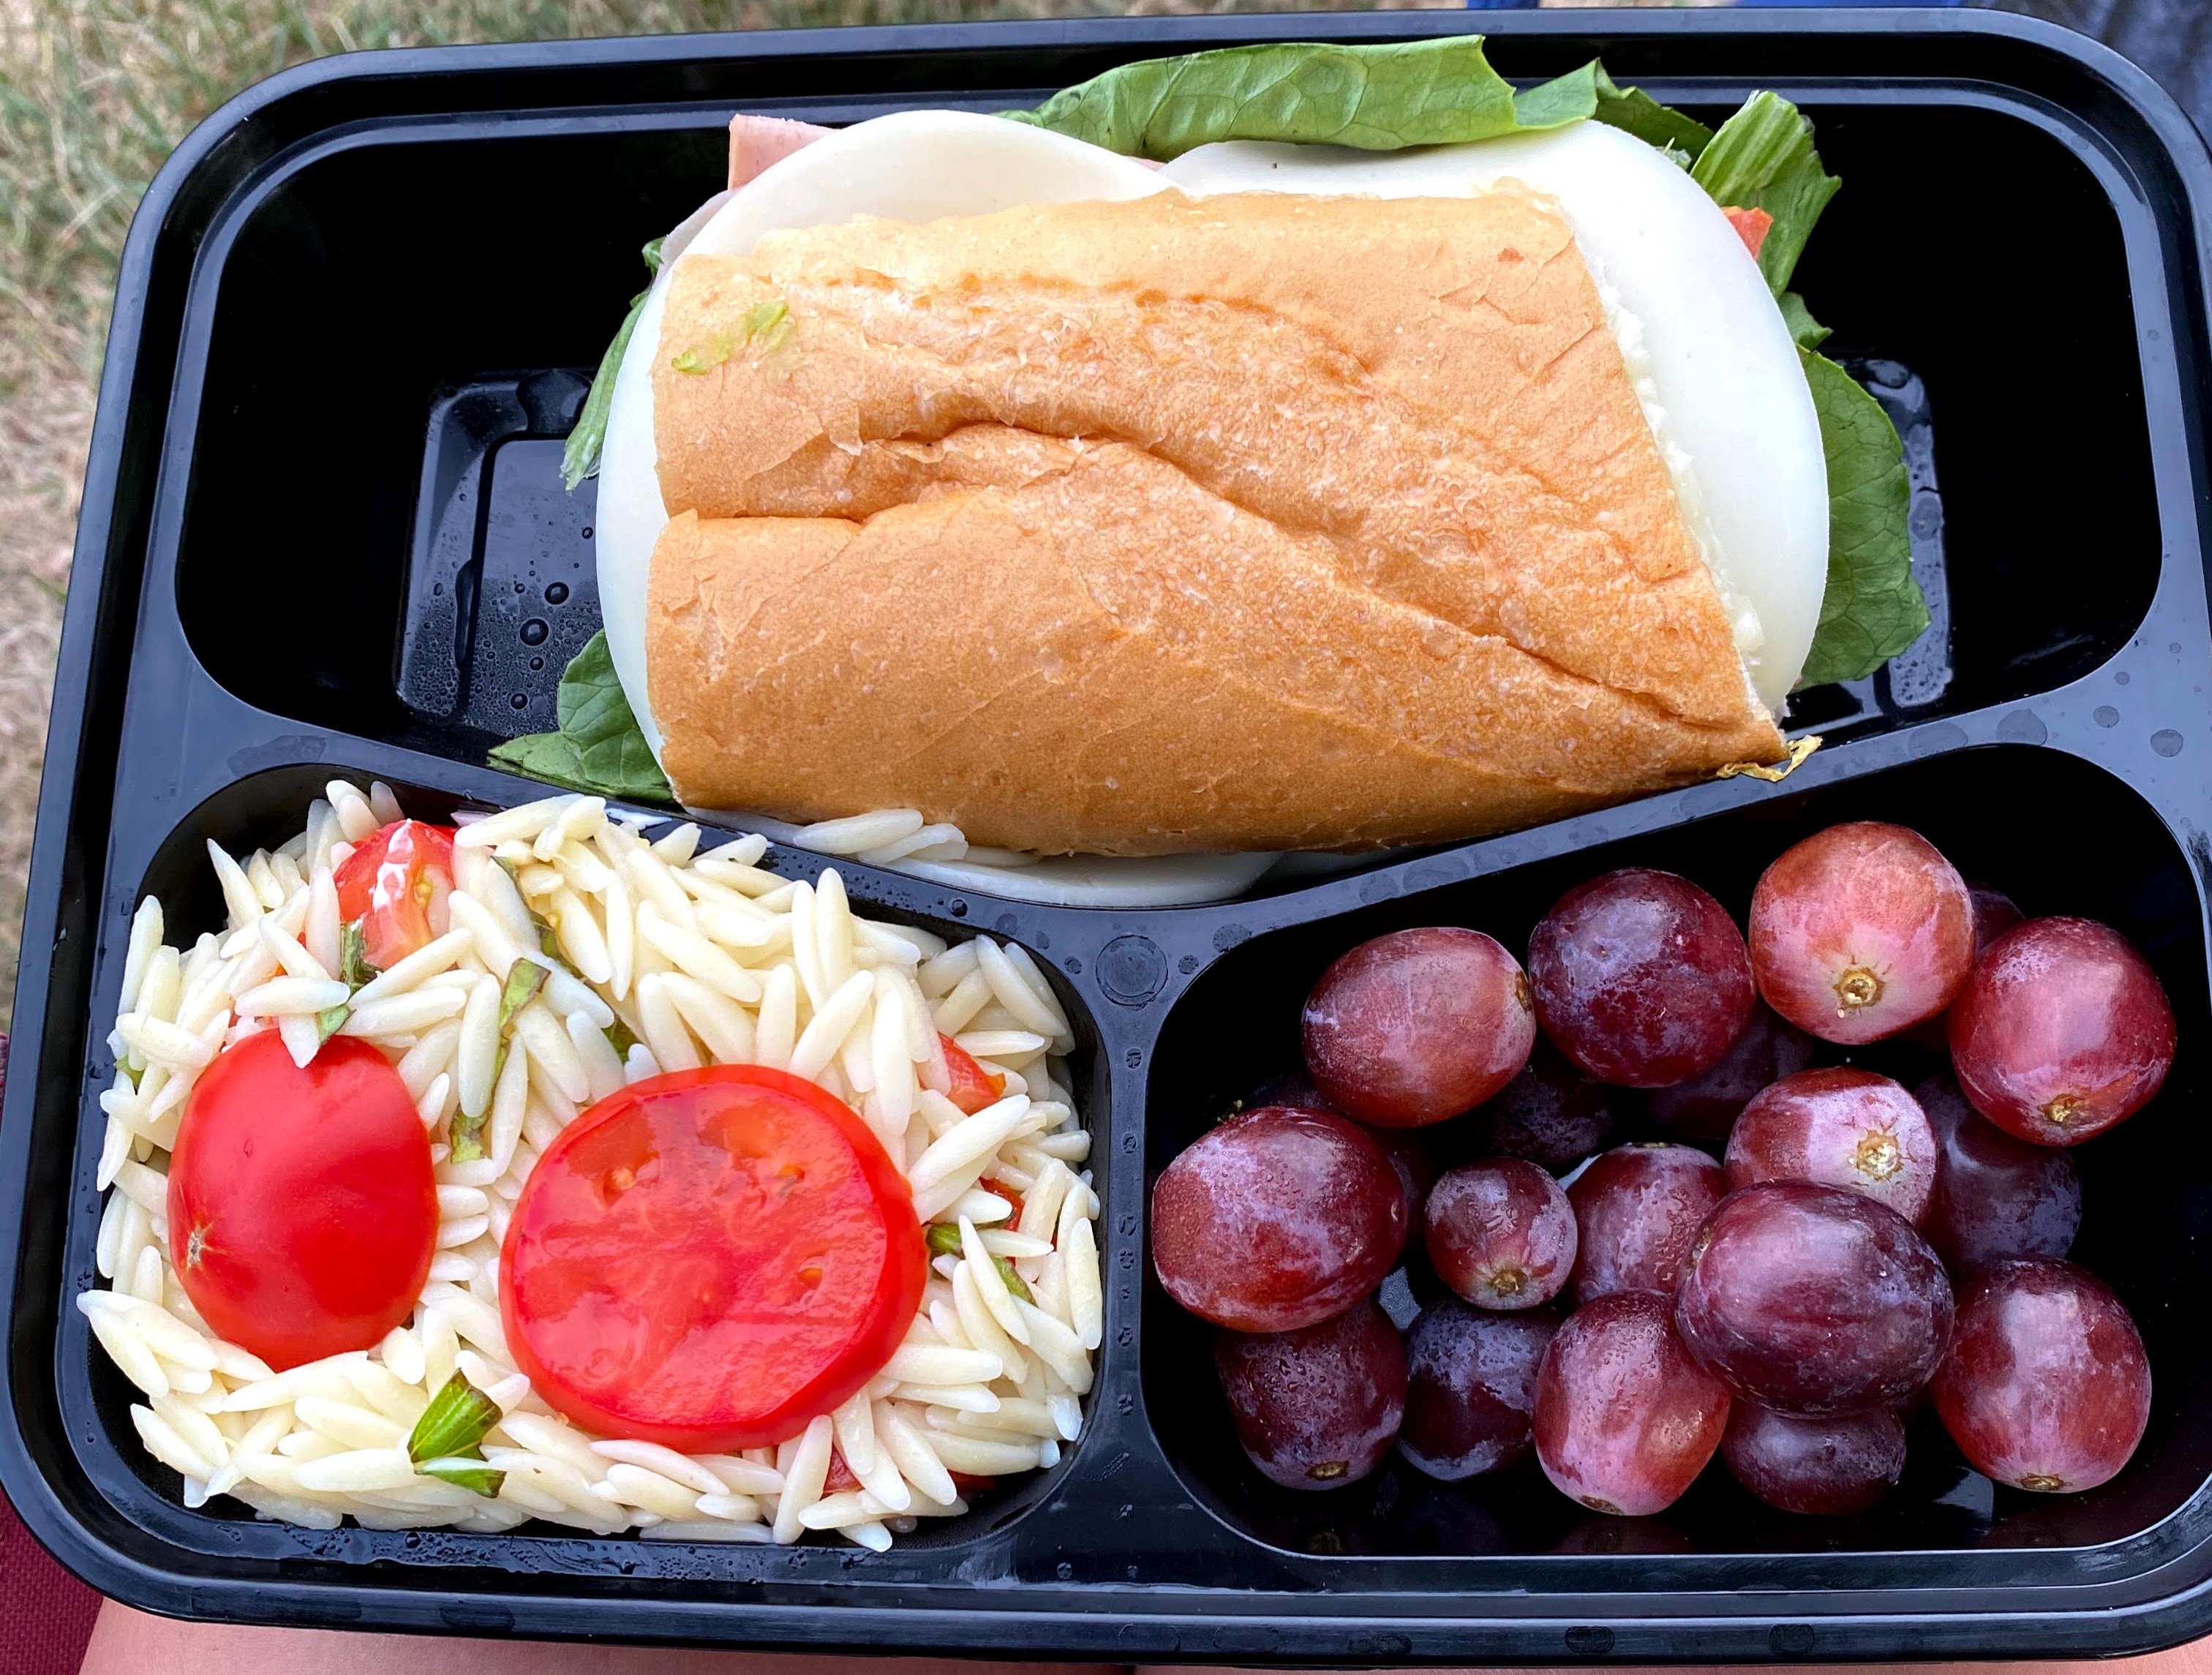
    I'm always thinking of new ideas to make for us for dinner as either a main dish or a side dish.  Since we are on the go a lot with baseball, many of our meals have to be quick, easy, and transportable (if that's even a word).  I was able to use both fresh basil and tomatoes from our garden to make this salad.  It was delicious and a great accompaniment to our sub sandwiches.  I'd serve this with hot dogs, burgers, and as a great side for your BBQ cookout.  

    This salad is a blank canvas.  Feel free to add grilled chicken, broccoli, mozzarella, sausage, or anything else you'd put in a pasta dish.  This would also be great served warm.  This is definitely something to make in advance if you are serving it cold.  After making it, put it in the fridge until you are ready to serve.

Ingredients:

  • 1 box orzo pasta cooked to package directions
  • 1 lemon, juice and zest
  • 1 heaping cup shredded basil
  • 5 to 6 large cherry tomatoes, quartered
  • 1/4 c. olive oil
  • salt and pepper

Directions:

  1. Cook pasta according to the package directions.  Be sure to season the water with salt before dropping the pasta.  You will need to reserve 1/2 c. of the pasta water before draining for the dressing.
  2. While the orzo is cooking, zest the lemon into a large bowl.  Juice the lemon into the bowl, being careful not to drop any seeds into the bowl.  Whisk in the olive oil.  Season with salt and pepper.
  3. Add reserved pasta water to the dressing.  Whisk.  It will seem watery, but the orzo will absorb the dressing.  Drain the pasta.  Set aside to cool.  Once the orzo has cooled down slightly, add it to the large bowl with tomatoes and basil.  Serve immediately or set in the fridge until you are ready to serve.  Enjoy!


Saturday, July 11, 2020

Taco Pasta Salad


Taco Pasta Salad with Cheese Quesadillas

        We have a longstanding joke in our family about this pasta salad.  I have mentioned many times before that we are a baseball/softball family.  Inevitably games are often scheduled during lunch and dinner times, so we have eaten many meals on while at a game.  This pasta salad was a staple for our game meals.  It's easy to pack and delicious whether it's served cold, at room temperature, or even warmed.  Every time we make this and we aren't at a game, we joke that we should be at a game since this is our "game meal."  I know, kinda silly, but it's what makes us, us.

    I've made this pasta salad with any cut of pasta, both long and short.  I will say it's easier to eat with the short cut pastas, but just as delicious with the long pastas like angel hair (pictured above).  This could be used as a side, or it's filling enough to be used as the main meal.  Above I served the pasta salad with cheese quesadillas, both regular and dairy free.  We also add in shredded cheese separately because of our dairy allergies, so every adds cheese on theirs on their plates.  

    You may all be familiar with the Doritos Taco Salad, and this is based on that recipe.  Sometimes I will add lettuce and crushed up tortilla chips.  Often I let everyone add their own chips since we make a lot of this this for leftovers and the chips become soggy in the pasta when in the fridge.  I originally added pasta to this salad so we could use it as a meal at games.  When everyone loved it as much as they did, I kept making it that way.  I also add in black beans, corn, and even green chilies sometimes.  However you like your tacos with all of the fixings, add in or omit whatever will work best for you and your family.

This recipe serves 6-8 with leftovers as a full meal.  Feel free to cut the recipe in half if you're making this as a side dish with your meal.

Ingredients:

  • 2 tbsp olive oil
  • 2.5 lbs ground beef
  • 1/2 onion, diced
  • 1 box of pasta
  • 1 can of black beans, drained
  • 1 4oz can of green chilies
  • 1 c. frozen corn, defrosted or fresh corn
  • 2 roma tomatoes, diced or 1 can of diced tomatoes
  • 1 tbsp each of chili powder, cumin, paprika, and garlic powder
  • salt and pepper
  • 1 bottle of French or Catalina dressing
  • extras: shredded cheese, tortilla chips or Doritos, lettuce, fresh cilantro, sour cream, guacamole

Directions:

  1. Cook pasta according to package directions.
  2. In a large skillet, add oil and heat to medium high heat.  Add ground beef.  Using a wooden or strong spatula spoon, break meat into small chunks while browning.  Season meat with spices, salt and pepper.  
  3. Once the meat is cooked through, drain.
  4. Drain pasta and allow to cool.  Transfer pasta to a large mixing bowl.  Add meat
  5. Return skillet to medium high heat, adding a little extra oil if necessary.  Add onion and green chilies, sauteing until the onions are translucent.  Add the beans and corn to warm through. Add this mixture to the large bowl.  Toss together with dressing.  Add 1 c. of the dressing at a time.  You may not need to use the entire bottle, you will be able to tell once all of the pasta is evenly coated with the dressing.  Add more dressing accordingly.  
  6. Add the following and/or serve on the side: shredded cheese, fresh cilantro, tortilla chips or Doritos, lettuce.  Serve sour cream and guacamole on the side if you'd like.
    I know you and your family will really enjoy this dish!  This has been our Taco Tuesday meal too once in a while!  Remember, this is great for a party as well.  Feel free to adjust the amounts listed above for the recipe.  Definitely a crowd pleaser!!  Enjoy!

Party Style Taco Pasta Salad

Served as a side with Chipotle Chicken Burgers

Tuesday, June 30, 2020

Mexican Coleslaw


Mexican Coleslaw

    Tonight with our dinner we had one of our family favorites as a side dish for "Taco Tuesday," Mexican Coleslaw!  When I make this, I base it after my typical coleslaw recipe, just add a few different ingredients and alter the dressing.  Because we have dairy allergies in our home, I make my dressing with a mayo base.  This helps to make it more creamy.  We are not huge fans of a mostly vinegar based slaw.

    This recipe can most definitely be made in advance.  I'd actually recommend it so the flavors can come together and "chill" in the fridge for a little while before serving.  In my humble opinion, room temperature slaw doesn't taste as good as "cold"slaw...haha..."cold"slaw.  Sorry, bad joke.  

    We've had this recipe with tacos, enchiladas, nachos, and other meals with our "Taco" Tuesday theme.  This is a great dish to bring to a party or BBQ, or just for a weekly dinner.

This recipe serves 6 with a little leftover.

Ingredients:

  • 1 bag of coleslaw
  • 1 jalapeƱo, remove seeds, diced
  • 3 green onions, diced
  • 1 c. frozen corn, defrosted
  • 1 c. mayo
  • 1/2 c. olive oil
  • 1 lime, zest and juice
  • 1 tsp. paprika
  • 1 tsp. chili powder
  • 1 tsp. onion powder
  • 1/8 c. chopped cilantro
  • salt and pepper

Directions:

  1. Combine last 8 ingredients in a small bowl.  Whisk together.
  2. Add first 4 ingredients into a large bowl.  Add dressing.  Mix well.
  3. Refrigerate for up to 4 hours.  Serve with your favorite burger, tacos, nachos, burritos, or more!  Enjoy!!

Wednesday, June 24, 2020

Dairy Free Mac and Cheese


    Looking at this picture, I bet you never would have guessed that this is dairy free mac and cheese, but it is!  How does this look just like the real thing you ask?  I'm just about to tell you.  My secret to making it super creamy is oat milk.  Yes, oat milk!  We have found that it has a much better taste with cooking than soy milk.  With Emma's dairy allergy we are always making things dairy free or having the same dishes, one with dairy, the other dairy free.  We have tried both soy and oat milks in cooking, and soy tends to be better with breakfast items, especially the vanilla flavor.  Since oat milk is thicker to begin with, it makes "creamy" dishes the consistency of having real dairy in them.  I honestly can't remember the last time we've used soy milk.  Almond milk is out for us because Emma has a nut allergy too, and coconut milk is good for certain meals, but NOT mac and cheese.  

    To make this sauce, I begin with a roux of flour and butter.  The butter is dairy free.  We buy an oil based butter, whichever is on sale.  Since we usually shop at Aldi, they are generally cheaper than most stores.  After my flour cooks down a bit, I whisk in the oat milk.  Once that has started a low boil, I will add an assortment of dairy free cheese.  We have provolone and cheddar on hand, both the slices and shredded.  Yes, they are costly, but definitely worth if for my kids to enjoy foods that normally have dairy.  

    Don't worry!  I also have a dairy version of the mac and cheese on the blog for you, which is EXTREMELY easy!!!  Even easier than this dairy free version.  I'm sure you love cooking recipes without many steps, don't you?

Ingredients:

  • 1 lb elbow macaroni noodles
  • 2 tbsp of non-dairy butter
  • 2 tbsp flour
  • 1 1/2-2 c. of oat milk
  • 1 c. shredded cheddar cheese
  • 2 slices each of dairy free provolone and cheddar cheeses
  • salt and pepper

Directions:

  • Heat a large pot with 4 c. water.  Bring water to a boil.  Season with salt.  Once the water boils, drop the pasta and cook until al dente, just shy of the time on the box.  Drain.  You don't want to cook your pasta all the way through because you will be warming it in the cheese sauce.  It will continue to cook in the sauce.
  • In a medium skillet, melt the non-dairy butter.  Once melted, add flour.  Whisk together and allow flour to cook out a bit.  It will become slightly brown.  
  • Whisk in the oat milk.  Continue to whisk to mix in all of the bits of flour and butter.  Season with salt and pepper.
  • Once the milk has come to a low boil and all of the bits are combined, add the cheeses.  Stir until well combined.
  • Add pasta to the sauce.  Stir to combine.  Adjust any seasonings.
You are ready to serve and ENJOY!!!

Saturday, June 20, 2020

Mexican Street Corn Pasta Salad


For anyone who loves the flavors of Mexican Street Corn, YOU will LOVE this recipe.  Mexican Street Corn, or Elote, is a common street food in Mexico.  Elotes are a cob of corn covered in a spicy mixture of mayo, sour cream, and chili powder.  Then topped with Cotija cheese and cilantro.  Elotes are often served at festivals and as a street food by food vendors in Mexico.  This recipe captures those flavors, and puts a little twist on them.  I've modified the recipe as it's dairy free, but please feel free to use your favorite cheeses and crema.  It was something totally different for the kids, but they really enjoyed it!  We hardly have any leftovers.

Ingredients:

  • 1 lb short cut pasta
  • 1 bag of frozen corn, substitute with fresh corn or canned corn
  • 1 jalapeƱo, diced
  • 1 tsp of chipotle in adobo sauce, substitute 2 tsp chili powder
  • juice and zest from 1 lime
  • 1/2 c. mayo
  • 3/4 c. tofu sour cream, substitute real sour cream (crema)
  • 1/4 c. chopped cilantro
  • dairy free mozzarella, substitute Cotija cheese or other types of shredded cheese
  • salt and pepper

Directions:

  1. Cook pasta.  Be sure to season the water with salt before dropping the pasta.  Cook to al dente, with a little bite to the pasta.  This way it won't be mushy.  Drop in the frozen bag of corn to the pasta water before draining.  Drain and allow to cool.
  2. While your pasta is cooling, in a large bowl combine mayo, sour cream, adobo sauce, lime juice and zest, and salt and pepper.  
  3. Once your pasta and corn are cool, add to the creamy mixture.  Add diced jalapeƱo, cilantro and cheese.  Season with salt and pepper.  Serve immediately or refrigerate up to 2 hours before serving.
We grilled pork chops to serve along with the Mexican Street Corn Pasta Salad.

Tuesday, June 9, 2020

Loaded Baked Potato Salad

   
 What do you do when it's just too hot to turn on your oven, but you have such a taste for a baked potato?  Make the Loaded Baked Potato Salad of course!  This is an extremely easy salad to make, and perfect for any BBQ.  You don't actually bake the potatoes as you would for a baked potato, but make them as you would for making mashed potatoes.  I used red potatoes when making this recipe, mainly because I didn't have to peel them.  I got lazy!  If you don't have red potatoes, using yellow or gold potatoes would be just fine, again you don't have to peel them.  I'm not sure about using Russet or baking potatoes.  Those you would definitely want to peel first.  Then mix in your favorite toppings for a loaded baked potato and enjoy!

Ingredients:

  • 2 to 3 lbs. red potatoes, diced
  • 1 c. mayo
  • 1 c. soup cream, I made this a dairy free version so I used Tofu sour cream (no one noticed!!!!)
  • 3 small green onions, diced
  • 6 slices of thick cut bacon, diced, cooked and drained
  • shredded cheddar cheese, keep it dairy free with dairy free cheese or regular
  • 1/2 c. fresh parsley, chopped finely
  • 1/2 c. olive oil
  • 1 tsp. garlic powder
  • salt and pepper

Directions:

  1. Dice the potatoes into small chunks, add them to a large pot.  Cover the potatoes with water, add salt, cover and turn on heat to boil.  Once boiling, turn the heat down to a smaller boil to continue to cook the potatoes.  Potatoes are done when they are fork tender.  Drain.
  2. While the potatoes are cooking, cook the bacon in a skillet.  After browned, remove with a slotted spoon onto a paper towel lined plate.  This will help to remove any extra grease.
  3. Combine mayo and sour cream in a small bowl.  Add parsley, garlic powder, salt and pepper, and olive oil.  Whisk together.  Your dressing will be creamy and thick.  If you'd like it a bit thinner, feel free to add more olive oil.  
  4. Add potatoes back to their original pot, add bacon, green onions, dressing, and cheese.  Mix well.  You are ready to enjoy!!  If you don't plan on serving right away, refrigerate for up to 4 hours.  Once you remove from the refrigerator, you may need to add a little more dressing if it soaked up in the potatoes.


Sunday, June 7, 2020

Corn Salad Reinvented

    If you're like me, you're looking for quick and easy recipes for your family that are also healthy, but also something that everyone will enjoy.  In an effort to meet this above criteria, I came up with this easy corn salad also became a use up for some leftovers.  We had corn on the cob for dinner the night before, and I really try to use up or reinvent our leftovers so as not to waste them and throw them away.  My family loves corn, especially corn on the cob, and because of this we tend to have it often, and I always have corn in the freezer.  Don't fret if you don't have fresh corn to make this salad.  Feel free to use whatever you have, frozen or canned.  It will work just as well!


I used this salad also as a way to incorporate as many veggies as I know my kids love.  I'm so blessed that I have a family that loves their veggies, especially salads.  We have a form of a salad every night for dinner.  Even if we have a cooked veggie alongside.

Ingredients:

  • 3 ears of corn on the cob, corn cut off
  • 1/2 frozen peas, cooked and cooled
  • 1 c. cole slaw mix
  • 2 avocados, diced
  • 1 large roma tomato, diced
  • 2 green onions, diced
  • juice of two limes or about 3-4 tbsp
  • 1 clove of garlic, grated
  • 1/4 c. olive oil
  • salt and pepper

Directions:

  1. In a small bowl, whisk together the lime juice, garlic, oil, and salt and pepper.  Adjust seasonings accordingly.
  2. Add the other ingredients to a medium size bowl.  Pour dressing over the corn salad.  Mix and serve!
Extremely easy and delicious!!  Enjoy!

Corn Salad with hot dog and curly fries!

Monday, May 25, 2020

Teriyaki Pasta Salad

Hawaiian Chicken Kabobs with Teriyaki Pasta Salad

    Have you ever searched for a recipe and couldn't find what you are looking for?  Thinking all the while that your idea for a recipe is definitely feasible and you're wondering why no one has thought of this before?  That's what happened to me for this recipe.  I found a couple of recipes that were similar to what I was thinking, but not exactly what I wanted.  When making my recipes, I always look to see if there is something out there that has been done before similar to what I was thinking, but I will always change the recipe up to make it my own.  When developing recipes, I focus on the tastes of my family and think of their likes and dislikes to make sure they will enjoy what we are having for dinner, lunch, breakfast, etc.  It's important for me to make what they like, but still challenge their pallets to often try new things.  Since we like teriyaki flavors, why not create a pasta salad to go along with our dinner?

Teriyaki Pasta Salad

Ingredients:

  • 1 lb angel hair or thin spaghetti pasta
  • 1 pkg. coleslaw mix
  • 1 c. green beans, cut into 1 in. pieces, fresh or frozen
  • 1/4 seedless cucumber, diced
  • 1/2 red onion, diced
  • 1 c. olive oil
  • 1/2 c. soy sauce
  • 2 tbsp rice wine vinegar
  • 3 tbsp honey
  • 1 clove of garlic, grated
  • 1 tbsp. sweet chili sauce, use 1 tsp of red pepper flakes if you don't have the sweet chili sauce
  • 1 tsp. ginger, ground
  • salt and pepper

Directions:

  1. Cook pasta according to package directions.  If you are using frozen green beans, add to pasta close to the end of it's cooking time, with 2 to 3 minutes remaining.  Drain and run under cool water.  This will help to remove excess starch on the pasta and avoid stickiness of the pasta.  
  2. Add olive oil through salt and pepper in a large bowl.  Whisk to combine.  Add remaining ingredients to bowl including pasta and green beans.  Toss all to combine.  Serve immediately.  You can store in the fridge for up to two hours.  Enjoy!!
Teriyaki Pasta Salad


Dairy Free Ranch Dressing

Has having a dairy free lifestyle prevented you from ever having Ranch Dressing?  Or suddenly converting to a dairy free diet?  I've been able to recreate a Ranch Dressing for my family that allows us to still enjoy the things we like and allow new possibilities for those of us that haven't been able to have something because of the ingredients.  This Ranch Dressing is mayonnaise based, and since it's naturally dairy free, it's a no brainer.  I know you're probably thinking, but how is it healthy?  For starters, I make my own mayo so I can control the ingredients I am putting into it.  Second, don't eat a ton of it!  Is there really a dressing that is healthy for you?  No, not really.  Even the vinaigrettes (oil based dressings) are not healthy if you have too much of it.  Why not indulge once in a while!  Enjoy the little things like Dairy Free Ranch Dressing!

Serve it with your favorite salad, I'd suggest a Cobb Salad, or even as a dip for breaded chicken.  Serve on a sandwich or simply a quick salad you have for dinner that night.  However you choose, to it will be the best!

Ingredients:

  • 1 c. mayonnaise, I make my own
  • 1/2 c. olive oil
  • 1/2 c. apple cider vinegar
  • 1 clove of garlic, grated
  • 1 tbsp fresh parsley, chopped
  • 1 tsp onion powder
  • 1 tsp dill, dried
  • salt and pepper

Directions:

  1. Combine ingredients into a small bowl.  Whisk until well combined.  Serve!  It will stay in an airtight container in the refrigerator for up to one week.
  •   

Thursday, May 21, 2020

Southwestern Chicken Wraps


Southwestern Chicken Wraps

    I've said this before, but my family LOVES "Taco Tuesdays."  In an effort to change things up each week, we don't always have the typical taco, but incorporate fajitas, enchiladas, burritos/wraps, and a variety of different tacos.  On this week's menu, Southwestern Chicken Wraps.  What's the connection to "Taco Tuesday?"  The "southwestern," of course!  I seasoned the breading for the chicken with spices I would normally use in my chili, Emma made fresh salsa, and we had a Zucchini and Corn Succotash.  In this recipe for the wraps, I will show you how easy it is to bread chicken breasts/tenders.  Once you learn the method, the possibilities are endless for the protein you decide to serve and coat with breadcrumbs!  

    So to briefly explain, breading should be done in three steps.  I cannot stress how important it is to season each layer of breading, starting with the flour, following by egg, and finally the breadcrumbs.  

Seasonings for breaded chicken

    Because we have two kids who can't eat dairy, I add a little oat milk to my egg mixture for the second layer of breading.  I have three eggs ready for this recipe because I had a lot of chicken, don't forget we have 6 people to feed in our family, but normally I'd suggest only 2. So, are you ready to get your hands messy?  Here's also an extremely helpful tip, I will often bread my protein (usually chicken) earlier in the day which frees me up some at dinner time, just prepare a baking sheet with parchment paper 1) so you have a landing spot for your chicken after it's breaded and 2) to prepare ahead of time and put in the fridge until you are ready to fry it, air fry it or bake it.

Ingredients:

  • 2 to 3 lbs chicken tenders or chicken breasts sliced into chicken tenders
  • 1/2 c. flour
  • 3 c. breadcrumbs
  • 2 to 3 eggs, scrambled with 2 tbsp oat milk (feel free to use cow's milk)
  • 1 tbsp chili powder
  • 2 tbsp Season Salt
  • 1 tbsp cumin
  • 2 tsp paprika
  • oil for frying, optional
  • 4 large tortillas
  • shredded lettuce
  • shredded cheese
  • Southwestern Dressing, recipe below

Directions:

  1. Combine seasonings in a small bowl and line baking sheet with parchment paper.
  2. Before breading, you will need three shallow bowls or deep plates to house the flour, eggs, and breadcrumbs.  I use a dinner plate for the flour and 2 9 in. pie plates.  One for the egg and the other for the breadcrumbs.
  3. If you are cooking the chicken immediately, preheat veggie oil in a shallow plan.  You will need enough to cover at least 1 side of the chicken pieces, to brown and cook one side of the chicken piece at a time.  I typically air fry the breaded chicken.  If you are air frying or baking immediately, preheat the oven or air fryer to 400 degrees.  
  4. Whisk the eggs together with the milk, and season each stage of breading with the spice mixture to evenly distribute the flavor and seasoning of the chicken.  Only seasoning the breadcrumbs will not season the chicken.  You must season the flour and the egg to also season the chicken.
  5. Coat each piece of chicken, one at a time, with flour, then with the egg mixture, lastly the breadcrumbs.  Put the breaded chicken pieces on the baking sheet while you are breading each other piece.  
  6. Once you've breaded each piece, you can stop at this point and store the chicken in the fridge until you are ready to cook them.  If your ready to cook the chicken, test the oil temp, by dropping a few breadcrumbs into the oil.  If the oil bubbles, it's ready.  If not, turn up the heat and wait a couple of minutes.  DO NOT crowd the pan.  If you place too many chicken pieces into the pan, the oil temperature will drop too quickly and you will not fry them evenly.  They will also not brown well.*
  7. If you are air frying or baking, put your chicken into the air fryer or oven for 20 minutes.  REMEMBER!  The chicken MUST be at 165 degrees to be fully cooked.
  8. Once your chicken is cooked, place two pieces in  the center of a large tortilla.  Top with shredded lettuce, shredded cheese (regular or dairy free), and Southwestern Dressing.  Fold in the sides of the tortilla, pull the bottom of the tortilla over the chicken and toppings.  Roll to close.  Repeat 3 more times.  


*If you are frying your chicken in batches, set your oven to 300 degrees to keep them warm while you fry each batch.  This will also help to fully cook the chicken.  Then when you are ready to serve, your chicken from the first batch will still be hot.

Southwestern Dressing

Ingredients:

  • 1/2 c. homemade or store bought salsa
  • 1/4 c. mayo
  • 2 tbsp olive oil
  • salt and pepper

Directions:

  1. Combine ingredients in a small bowl.  Whisk and serve.  Store in a sealed container in the refrigerator for up to a week.  Include dressing in Southwestern Wrap or use for coleslaw dressing with shredded cabbage.  Can also be used as a dip with tortilla chips.

Wednesday, April 22, 2020

Spring Pea Risotto

https://drive.google.com/uc?export=view&id=13c8sUW1u_2XWBILR5-PVBDr2BvAgS2iUThere are so many people who shy away from making risotto.  NOT JUDGING by any means!!!  I'm here to tell you, that it's SUPER easy, just a bit time consuming.  Lots of stirring, water/chicken broth adding, and waiting...BUT SO WORTH it!!!  The recipe below is for a spring pea risotto, but feel free to experiment and add just about any veggie, pesto cheese.  Some of our favorites include:

  • asparagus, broccoli, zucchini and summer squash, sun-dried tomatoes, mushrooms
  • basil pesto, sun-dried tomato pesto
  • garlic and herb goat cheese, garlic and herb cream cheese
David doesn't like mushrooms, so I don't use them for when I make risotto for us, but not too long ago I made a mushroom risotto for my parents during this Stay-at-Home journey.  In their pantry they also had a can of cream of mushroom soup.  I decided to add that too.  I've never added a creamy soup before, I usually just use heavy whipping cream or half and half, but since they had it, and.I was trying to make meals for them using what they had on hand, I figured give it a shot.  Since adding the creamy soup I cut back on the half and half, but the risotto turned out to be pretty tasty! So who knows?  Next time I make risotto and I happen to have a creamy soup on hand I may try it again.  

If you're on a budget, like many of us are, Arborio rice can be pricey.  I've found a pretty good substitute for Arborio, that's a LOT cheaper...Calrose rice.  I cook it the same as I would Arborio when making risotto and since it's a short grain, starchy rice it's a perfect replacement for Arborio and will save you a few dollars.

You'll come to learn that throughout my recipes I honestly don't use a lot of measurements.  I cook mostly by taste and look or consistency.  Mostly by taste though.  In my recipes, like this one, I will give ranges of ingredients and I'll explain further in the directions.  For this recipe in particular, I suggest 2 cups of Arborio rice, when in reality, when I make risotto, I pour about two cups of the Arborio rice into a cereal bowl until it's time to add to the pot.  I then use the same cereal bowl to measure out the water or stock.  Hey, don't judge...it's how I cook.  But not to worry, I walk you through the steps, and share how I do it the way that I do.

So without further adieu...

Spring Pea Risotto!


Ingredients:

  • 2 tbsp butter and olive oil plus 1 tbsp butter
  • half of medium onion, diced
  • 1 tbsp diced or minced garlic
  • 2 cups Arborio Rice, pour into a cereal bowl big enough to hold about 2 cups
  • 1 cup white wine
  • several cups of chicken stock or water, you will use the bowl used for the rice, and fill up the same amount of water or stock to add to the rice 3 or 4 times depending on the softness of your rice
  • 1 cup frozen peas
  • 1 cup half and half or heavy cream
  • 1 6oz pack of herbed goat cheese, 4 oz of herbed cream cheese
  • 1/2 cup parmesan
  • salt and pepper
I'm not promoting any products, but this is what I use for my risotto, and since we are on a budget we shop mostly at Aldi.

Directions:

  1. Add 2 tbsp butter and olive oil to pan to melt better.  SautĆ© diced onions and garlic for 5 minutes, until slightly brown.  Season with a little salt and pepper.  
  2. Add rice  to the pan and stir to combine.  Allow the rice to brown slightly, this will only take 2 to 3 minutes.  While this the rice is browning, fill the bowl you used for the rice now with water or chicken stock.  I used water for this recipe.
    Steps 1 -3
  3. Add wine, and stir to combine.  Wine will cook down and be absorbed by the rice.  
  4. Once most of the wine has been absorbed, add one bowl of water to the pan. 
    Step 4
  5. Stir to combine.  You will need to stir often so the rice doesn't stick to the bottom.  You may also want to season a bit more with salt and pepper.  Fill up the bowl again with water or stock and add to the pan once most of the previous bowl of water has absorbed. 
    Step 5
  6. Add the next bowl of water to the pan.  Stir to combine.  Continue to stir periodically.  The water will continue to absorb and the rice will continue to soften.  
  7. You will need to add at least one more bowl of water to the pan.  Taste your rice to check for doneness, if it's soft or not.  If yes, your done adding water or stock.  Just continue to cook and stir for the water to absorb.  
  8. Once the water is pretty much absorbed, add the half and half and cheeses.  Stir to combine.  Once the half and half has been absorbed and the cheese melted, add the frozen peas and turn heat down to simmer.  Allow to finish cooking and thicken, about 5 minutes. Taste again and adjust seasonings if necessary. 
    Spring Pea Risotto

    This recipe will serve 4 to 6 people depending on what you are serving along with your risotto.  We usually have a sauteed or breaded chicken breast, and when we want to splurge, New York Strip.  A nice Caesar salad and crusty bread is also a nice compliment to your risotto.  

    I truly hope you find this recipe easy to recreate!  I can't wait to hear what your risotto creations are!

    Enjoy!