Wednesday, July 29, 2020

Beef and Potato Enchiladas

    Something I haven't made in a really long time is enchiladas.  The night before I had used half of the ground beef we had to make meatballs, and I wanted to use up the other half tonight.  We've also had potatoes laying around, so I decided to incorporate them into the filling.  This is similar to a Mexican street taco, so I figured, why not?  I was also kinda lazy today and didn't feel like making my own enchilada sauce.  I opted for the jar of salsa verde we had in the cabinet.  Typically salsa verde is used with chicken, but it's okay to step outside of the box once in a while.  Plus, my kitchen, my rules, right?  Haha!  And they turned out really well!

    As usual I prepared to versions of the enchiladas, one dairy free and the other with dairy.  All that means is the choice of cheese I used to roll and top them.  

Recipe yields 5 servings.

Ingredients:

  • 2 tbsp olive oil
  • 1.5 lbs. ground beef
  • 2 tsp. each of chili powder, garlic powder, paprika, cumin
  • salt and pepper
  • 4 large baking potatoes, baked and diced
  • 1/2 large red onion, diced
  • 1 jalapeño, seeded and diced
  • 8-12 flour tortillas
  • shredded cheese, regular and/or dairy free
  • 1 12 oz. jar salsa verde
  • Toppings: cilantro, sour cream, diced tomatoes, lettuce, guacamole

Directions:

  1. Place 4 large baking potatoes into an oven safe dish.  Toss with olive oil, salt and pepper.  Prick all around the potatoes with a fork.  Bake at 400 degrees for 45 minutes.  Check tenderness of the potatoes.  A fork or knife should easily pierce the potatoes.  Remove from the oven and allow to cool completely before dicing.
  2. Add olive oil to a large skillet on medium high heat.  Add ground beef.  Add seasonings including salt and pepper.  Brown the meat.  Add onions and jalapeño.  Mix well.  Cook about 3 minutes.  Add diced potatoes.  Combine well allowing the potatoes to soak up the seasonings from the pan.  Adjust salt and pepper as needed.
  3. Preheat oven to 400 degrees.  Prepare two baking dishes if making some dairy free.  Spray bottom with cooking spray to prevent any sticking of the tortillas.
  4. Spread 1 large spoonful of salsa on the bottoms of the baking dishes.
  5. Spoon meat mixture (about 1 1/2 spoonfuls) onto tortillas.  Top with with a little cheese.  Roll and place seam side down into baking dishes.  You will be able to fit 8-10 tortillas into a large baking dish.  I use a smaller baking dish for the dairy free since I don't need as many.  
  6. Top tortillas with remaining salsa, spread out evenly, and more cheese.
  7. Bake for 25 minutes, until cheese is bubbling and turning brown.  Remove from the oven and allow to cool for 5 minutes before serving.  Enjoy!!
Full dairy version pictured


Monday, July 27, 2020

Roasted Red Pepper and Tomato Sauce

    I had a jar of roasted red peppers in the cabinet and have been wanting to use them up.  I finally came up with the idea of making a pasta sauce with it.  After looking for inspiration from recipes online, I needed one dairy free, that I was able to come up with this.  We had it with homemade meatballs and fresh pesto.  Best part?  I incorporated more of our fresh basil from our garden.  

    This sauce is quick, easy, and vegan.  I know, I know.  All it means to me is that it's dairy free, ultimately safe for my kids to eat.  No nuts either, so that's a bonus for my daughter who also has a nut allergy.  There is little cooking involved, and it will store in the fridge in an airtight container for up to two weeks.  Fabulous!

Ingredients:

  • 2 tbsp. olive oil
  • 3 cloves of garlic, minced or grated
  • 1 28 oz. can of crushed tomatoes
  • 1 14 oz. jar of roasted red peppers, drained
  • 2 c. fresh basil
  • salt and pepper to taste

Directions:

  1. Add olive oil to a large skillet on medium heat.  Add garlic, stir and cook for about 30 seconds.  Reduce heat to low and slowly add the tomatoes.  Stir until well combined.
  2. Season with salt and pepper.  Allow to cook for about 1-2 minutes, or until the tomatoes are bubbly.
  3. Carefully transfer the tomatoes to a food processor or blender.  Add the roasted red peppers and basil.  Puree.  Set aside to use with your favorite pasta.  Toss together when ready to eat!  Enjoy!!
Note: Save any remaining sauce in the fridge for up to two weeks in an airtight container.

Roasted Red Pepper Sauce with Pesto Meatballs and Vegan Pesto Pasta

Vegan Basil and Spinach Pesto

    As you know, we have a dairy allergy in our house.  We've been wanting to have pesto for the longest time, but couldn't because of the parmesan cheese and pine nuts.  Although my daughter has been cleared to eat pine nuts, why take the chance?  Plus, we have lots of fresh basil in our garden, so what better than to make pesto?


    Making the pesto was a lot easier than I thought!  I added everything to my food processor, blended and it was done!  I added a combination of fresh basil and spinach.  You can just use fresh basil, or spinach or arugula.  Whatever you prefer, and ultimately have on hand.  This recipe is great as a snack on crackers or your favorite pasta.

Recipe yields 1/2 cup of pesto.

Ingredients:

  • 2 to 3 cloves of garlic
  • 1/4 c. olive oil
  • 2 cups fresh basil, spinach or arugula
  • 2 tbsp nutritional yeast
  • 1/2 tsp salt
  • pinch of pepper

Directions:

  1. Combine ingredients into a food processor.  Blend until all of the ingredients are mixed well.  
  2. Serve tossed in your favorite pasta, as a snack on crackers, or over bruschetta.  
You may save leftover pesto in an airtight container in the fridge for up to one week.

Friday, July 24, 2020

Greek Tacos with Lemon Rice and Creamy Cucumbers


       Here it is Taco Tuesday again and expanding the kids palettes.  We had Greek Tacos using pitas for the taco shell instead of tortillas.  It was also a night of baseball, so we had split dinners with the kids eating at the game and David and I ate when we got home.  It's what we have to do sometimes.  

    One great thing to share about this meal is since we had to eat separately, this meal was great to make ahead of time, and heat up accordingly.  Actually the cucumbers get better when they sit in the fridge for a bit to allow the flavors to come together.

Don't get overwhelmed!  Yes there are a lot of ingredients, but in the directions, I separated them into the three dishes in this post.  

This recipe serves 6 with a little leftover.

Ingredients:

  • 2 tbsp and 1/4 c. olive oil
  • 2.5 lbs ground beef
  • 1 medium onion, 1/2 sliced and 1/2 diced
  • 2 pkgs pita
  • 3 tbsp Greek seasoning: 2 tsp each of onion and garlic powders, 1 tbsp dried oregano, 1 tbsp dried basil, salt and pepper, 1 tsp dried dill
  • Juice and zest from 1 lemon, reserve 1 tsp for the cucumbers
  • 2 cups rice
  • 2 tbsp dairy free butter
  • handful of chopped fresh parsley
  • 1/2 of one large seedless cucumber, sliced into quarters
  • 1 cup mayo
  • 2 tbsp sugar
  • 1/4 c. white wine vinegar, more if needed
  • 1 tsp. dried dill
  • pinch of mustard seeds
  • salt and pepper
  • Taco toppings: sliced tomatoes, Creamy Cucumbers, diced onion, coleslaw mix

Directions:

Greek Taco Meat
  1. Add 2 tbsp of olive oil to a large skillet.  Once heated on medium high heat, add the ground beef.  Season with 2 tbsp of the Greek seasoning mixture.  Add additional salt and pepper if needed.  Brown and drain.  Set aside.
Lemon Rice
  1. Heat 4 1/2 c. water in a medium pot.  Cover and bring to a rolling boil.  
  2. Season with salt and remaining Greek seasoning.  Once the water is boiling, add rice. Stir, cover, and reduce heat to simmer.  Rice is cooked when the water is cooked out and no longer crunchy.  Remove from heat.  Add lemon juice and zest and parsley.  
Creamy Cucumbers
  1. In a medium size bowl combine mayo, sugar, vinegar, 1/4 olive oil, 1 tsp dried dill, salt and pepper, mustard seeds, and reserved lemon juice.  Whisk together.
  2. Add sliced onions and cucumbers to the bowl.  Mix well.  Adjust seasonings if needed.  
  3. This is best when made in advance and refrigerated for at least an hour.  
  4. When serving use as a garnish or on the side or both!  
Assembling the Tacos
  1. Warm pitas at a low temperature in the oven for a few minutes.
  2. Top with Greek Taco Meat mixture, diced onions, Creamy Cucumbers, coleslaw mix, and sliced tomatoes.  Enjoy!!
Shown prepackaged for the baseball game.

Baked Ham, Turkey, and Cheese Sandwiches

    Have you ever had one of those days when what you planned for dinner, just didn't work out?  This meal was a result from one of those days.  Lately, I've been doing the grocery shopping for three households: ours, my parent's and David's parents.  I'm able to go shopping for my parents and David's parents at Mariano's, but we usually shop at Aldi for ours.  This week there was a lot to get, so I had to split my shopping days into two instead of one, therefore I didn't get the things I had planned on for dinner, hot dogs and Velveeta.  We also didn't have milk for the mac and cheese.  Now what?  I improvise.  What do we have on hand that I can make?  Burger buns, ham lunchmeat, sliced and shredded cheeses (dairy and dairy free), cream cheese, oat milk and half and half.  I used the cream cheese and half and half to make one version of the mac and cheese, then the oat milk and dairy free cheese to make the other.  Next, I made ham and cheese sandwiches, spread garlic butter on the top of the buns, and baked in the oven until the cheese melted and and the tops browned.

    Don't underestimate yourself!  If this ever happens to you, think through what you have on hand and be creative!  Your kids will love it, or even better...get them to come up with ideas with you!  The process becomes so much more fun!!


Ingredients:

  • burger buns
  • turkey and ham lunchmeat
  • assorted sliced cheeses (I used provolone and colby, as well as dairy free for separate sandwiches)
  • 2 tsp garlic powder and dried parsley
  • 2 tbsp dairy free butter

Directions:

  1. Preheat oven to 400 degrees.
  2. Spray two separately baking dishes with cooking spray.  Use one for dairy and the other for non-dairy versions.
  3. Line baking dishes with the bun bottoms.  Top with ham and turkey lunchmeat.  1-2 slices each.  Top with a slice of cheese.  Place on burger bun tops.  
  4. Combine butter, garlic powder and parsley.  Spread evenly on each top.  Bake in the oven until heated through, the cheese is melted and the buns are a little brown.  Depending on your oven this could be 20-25 minutes.
  5. Serve warm!  Enjoy!

Dairy Free Version


Dairy Free Version

Saturday, July 18, 2020

Ready for an unexpected thriller?


 This is the second book I've read by Colleen Hoover.  The first book I read was Regretting You, which I thoroughly enjoyed.  This book did definitely not disappoint.  I've read through so many fantastic reviews on Goodreads about Verity, that I figured it was time to see for myself, and when I was able to get the book through my Kindle Unlimited, I took full advantage.  

    The premise of the book is about the author Verity Crawford.  She's been in a near fatal car accident and is still under a contract to finish her book series.  Her husband, Jeremy, hires an up and coming author, Lowen Ashleigh, to finish the series on Verity's behalf.  Lowen agrees because she can desperately use the money offered to her for this venture, her mother recently passed away, and she needs something to focus on in life.  In order to do this, Jeremy suggests that Lowen come to their home to sort through Verity's materials and files for inspiration and get a feel for Verity's writing.  Throughout the process, Lowen learns not only about Verity's crash, but also the deaths of their twin daughters. 

    Quite often while she's staying at their home, Lowen feels extremely uncomfortable, like Verity is watching and very much alive, even though no one believes her.  She keeps wanting to leave, but Jeremy keeps asking her to stay, as they are forming their own type of connection.  

    Just when I thought I knew the outcome of the book, Hoover takes an unexpected turn throwing me way into left field.  Anyone who is looking to read a very well-written unexpected thriller, this book is for you.  It's quick moving, and I couldn't put it down because I wanted to know what would happen next.  
This entry was posted in

Penne Pasta with Ground Turkey


     Have you ever just had a taste for pasta with meat sauce?  A comforting meal just for the heck of it?  Even though it could be 90 degrees outside, David had a rough few days with work and I figured he needed something for dinner that A) didn't take a lot of effort and B) was a great hearty dinner just for the two of us to enjoy.  I figured this would be an opportunity to use up some fresh veggies from the garden and meat from the freezer.  I had ground turkey in the freezer, fresh basil and parsley, zucchini, pasta and tomato basil pasta sauce.  The above picture is the result.

    I doctored up the jarred pasta sauce with the fresh herbs, fresh garlic and zucchini.  I sauteed the garlic with some olive oil, added the zucchini, salt and pepper.  I then added the sauce, and fresh herbs.  I combined the browned ground turkey to the sauce and tossed all together with the cooked pasta.  Extremely easy and quick to put together.  

Ingredients:

  • 4 tbsp olive oil, split into 2
  • 2 cloves of fresh garlic, minced
  • 1 box penne pasta
  • 2 lbs. ground beef
  • handful of fresh parsley, chopped
  • handful of fresh basil, thinly sliced
  • 2 tsp. dried oregano
  • 1 jar tomato and basil pasta sauce
  • salt and pepper

Directions:

  1. Cook pasta according to package directions.
  2. Add 2 tbsp olive oil to a large skillet.  Once the oil is heated at medium high heat, add turkey.  Season with salt and pepper and oregano.  Continue to brown until cooked through.  Drain and transfer to a plate.
  3. Add remaining tbsps of oil to the skillet used to cook the ground turkey.  Add minced garlic and zucchini.  Season with salt and pepper.  Saute for about 3 to 5 minutes.  Add jarred sauce.  * Quick Tip: To get all of the sauce out from the jar, add a little water to the empty jar, return the cap to the jar, shake, and pour the remaining bits of sauce and water to the skillet.  Stir to combine.  Add fresh parsley.  Once the sauce is heated through, add the turkey.  Adjust seasonings.  Remove from the heat and add the basil.  
  4. It's your choice if you want to toss everything together with the pasta or serve the sauce and pasta separately.  Top with a little freshly grated parmesan.  Enjoy!!

Tuesday, July 14, 2020

Slow Cooker Italian Beef

   
    Normally when I make this recipe I will use a chuck roast and let it cook all day long.  I made a quick switch of dinner the other night, so I used what I had on hand, stew meat already pre-cut.  I used the same seasonings that I would for when I make the chuck roast, so keep in mind that the cuts of beef are versatile.  The stew meat is still something that I would suggest to cook on low for at least four hours to make the meat tender.  The chuck roast, however you would need to cook all day.  Quick tip, set it overnight, then all you'd have to do for dinner the next day is shred the beef and warm it.

    This recipe is extremely easy and quick, just a dump and go recipe until the meat is cooked fork tender.  I use a variety of Italian spices, 1/2 jar of banana pepper rings, and French onion soup mix.  

This recipe yields 6 -8 servings.

Ingredients:

  • 2 tbsp. olive oil
  • 2.5 to 3 lbs. stew meat or chuck roast
  • 1 packet of French onion soup mix
  • 1/2 jar and juice of mild banana peppers
  • 2 tsp. oregano
  • 2 tsp. basil
  • salt and pepper

Directions:

  1. In a large skillet or in your slow cooker (if you have this) feature all the oil and heat on medium high heat.  Brown the meat.
  2. Once the meat is browned, add the remaining ingredients to the slow cooker.  Set the slow cooker for 4 to 8 hours on low depending on the cut of meat you are using.  
  3. The juice from the meat will be thin.  If you like it a little thicker, make a cornstarch slurry and turn the slow cooker on high to thicken the sauce. 
Serve on hoagie style rolls or round rolls with your choice of cheese (provolone is best), and alongside fries, coleslaw or a pasta salad!  Enjoy!!

Saturday, July 11, 2020

Chipotle Chicken Burgers with Chipotle Mayo


      I am always wanting to try new things and new dishes for my family.  Sometimes I will use my husband and I as guinea pigs when all of the kids aren't home (with their other parent) to determine whether or not the kids would like certain dishes.  This happens to be one of those dishes.  Not that they don't like burgers, are you kidding?  Our kids LOVE burgers, but these burgers are made with ground chicken, something foreign to them.  Yes, we've had turkey burgers and ground turkey in other dishes, but they've never had ground chicken.  These burgers are nicely seasoned and not too spicy despite the chipotle peppers, so we think they will really like them.  Hey, at least we really did!  

    When making burgers with other ground meats other than ground beef like ground turkey or ground chicken, you will need to be sure to add breadcrumbs and eggs.  There is not a lot of fat in these types of meat and won't hold together as well without the egg and breadcrumbs.

    I've seen similar recipes that call for 2 to 3 chipotles, diced, but holy cow, that's going to be an extremely spicy burger!  I used half of a pepper, and removed the seeds before dicing it.  That was a perfect amount of spice for us because I made a chipotle mayo to top the buns.  I used the other half of the pepper in the mayo.

    Quick tip!  When handling ANY spicy pepper, wear plastic gloves first.  I can't tell you how many times I've not worn gloves, diced spicy peppers, and then later rubbed my eyes...OUCH!!!!  Don't ever try it.  Trust me on this one.

    These burgers would be great served along with fries, a creamy coleslaw, creamy cucumbers (pictured above), Taco Pasta Salad, Mexican Street Corn Pasta Salad, or chips.  

This recipe makes 5 big burgers.  When I make this for all of us, I will add another pound of ground meat, and adjust ingredients accordingly.

Ingredients: 

Burgers

  • 2 lbs. ground chicken
  • 1/2 canned chipotle pepper, seeds removed and diced, include a little of the adobo sauce
  • juice from 1/2 lime
  • 2 eggs
  • 1/4 c. chopped fresh parsley
  • 1 1/2 c. breadcrumbs
  • salt and pepper
Mayo
  • 1/2 canned chipotle pepper, seeds removed and diced, include a little of the adobo sauce
  • 1/2 c. mayo
  • juice from 1/2 lime
  • 2 tbsp chopped fresh parsley
  • salt and pepper

Directions:

  1. In a large mixing bowl add all of the ingredients for the burgers.  Using a wooden spoon, stir until thoroughly combined.  If the meat mixture feels extremely loose add a little more breadcrumbs until you can form a patty and it won't fall apart.
  2. Line a baking sheet with parchment paper.  Set aside.  To form the burgers, make a ball of the meat mixture about the size of a baseball, slightly larger.  Flatten to a round patty about 3/4 in. thick.  Using a thumb, put an indentation into the center of the patty.  This will allow the burgers to rise evenly and not form into a baseball while cooking.  Set burger patties on the baking sheet.  Once all of the burgers are made, cover with foil and place in the fridge.  These burgers can be made early in the morning and grilled at dinner time.  It's better to grill these burgers when they are cold and not at room temperature.
  3. Grill or broil until internal temperature reaches 165 degrees F.
  4. While the burgers are grilling, make the mayo.  Combine all of the ingredients for the mayo in a small bowl.  Whisk to combine.  Set in the fridge until ready to use.
  5. Serve burgers on toasted potato rolls, pretzel buns, with the chipotle mayo, lettuce, sliced onion, tomatoes and cheese.  Enjoy!!

Taco Pasta Salad


Taco Pasta Salad with Cheese Quesadillas

        We have a longstanding joke in our family about this pasta salad.  I have mentioned many times before that we are a baseball/softball family.  Inevitably games are often scheduled during lunch and dinner times, so we have eaten many meals on while at a game.  This pasta salad was a staple for our game meals.  It's easy to pack and delicious whether it's served cold, at room temperature, or even warmed.  Every time we make this and we aren't at a game, we joke that we should be at a game since this is our "game meal."  I know, kinda silly, but it's what makes us, us.

    I've made this pasta salad with any cut of pasta, both long and short.  I will say it's easier to eat with the short cut pastas, but just as delicious with the long pastas like angel hair (pictured above).  This could be used as a side, or it's filling enough to be used as the main meal.  Above I served the pasta salad with cheese quesadillas, both regular and dairy free.  We also add in shredded cheese separately because of our dairy allergies, so every adds cheese on theirs on their plates.  

    You may all be familiar with the Doritos Taco Salad, and this is based on that recipe.  Sometimes I will add lettuce and crushed up tortilla chips.  Often I let everyone add their own chips since we make a lot of this this for leftovers and the chips become soggy in the pasta when in the fridge.  I originally added pasta to this salad so we could use it as a meal at games.  When everyone loved it as much as they did, I kept making it that way.  I also add in black beans, corn, and even green chilies sometimes.  However you like your tacos with all of the fixings, add in or omit whatever will work best for you and your family.

This recipe serves 6-8 with leftovers as a full meal.  Feel free to cut the recipe in half if you're making this as a side dish with your meal.

Ingredients:

  • 2 tbsp olive oil
  • 2.5 lbs ground beef
  • 1/2 onion, diced
  • 1 box of pasta
  • 1 can of black beans, drained
  • 1 4oz can of green chilies
  • 1 c. frozen corn, defrosted or fresh corn
  • 2 roma tomatoes, diced or 1 can of diced tomatoes
  • 1 tbsp each of chili powder, cumin, paprika, and garlic powder
  • salt and pepper
  • 1 bottle of French or Catalina dressing
  • extras: shredded cheese, tortilla chips or Doritos, lettuce, fresh cilantro, sour cream, guacamole

Directions:

  1. Cook pasta according to package directions.
  2. In a large skillet, add oil and heat to medium high heat.  Add ground beef.  Using a wooden or strong spatula spoon, break meat into small chunks while browning.  Season meat with spices, salt and pepper.  
  3. Once the meat is cooked through, drain.
  4. Drain pasta and allow to cool.  Transfer pasta to a large mixing bowl.  Add meat
  5. Return skillet to medium high heat, adding a little extra oil if necessary.  Add onion and green chilies, sauteing until the onions are translucent.  Add the beans and corn to warm through. Add this mixture to the large bowl.  Toss together with dressing.  Add 1 c. of the dressing at a time.  You may not need to use the entire bottle, you will be able to tell once all of the pasta is evenly coated with the dressing.  Add more dressing accordingly.  
  6. Add the following and/or serve on the side: shredded cheese, fresh cilantro, tortilla chips or Doritos, lettuce.  Serve sour cream and guacamole on the side if you'd like.
    I know you and your family will really enjoy this dish!  This has been our Taco Tuesday meal too once in a while!  Remember, this is great for a party as well.  Feel free to adjust the amounts listed above for the recipe.  Definitely a crowd pleaser!!  Enjoy!

Party Style Taco Pasta Salad

Served as a side with Chipotle Chicken Burgers

Friday, July 10, 2020

Tomato and White Bean Soup


        I had such a taste for soup today.  I went grocery shopping this morning for my in-laws and one of the items on their list was soup.  Yes, it would have been "soup"er simple to buy a can and heat it up when I got home, but for me, it's more rewarding to make the soup from scratch.  I ran through a mental snapshot of what I had in our pantry and fridge, and knew exactly what kind of soup I wanted to make; tomato and white bean.  Why soup on a hot day during the month of July?  Why not, is what I say!  The best part of this soup is not only that it's filling and delicious, but takes no time at all!  I started making it as soon as I got home, which was around 11:30, and I was ready to eat by noon.  

    I normally add in lots of veggies too, but didn't have everything on hand that I would normally add, so added onions, carrots, tomatoes, and a baby kale mix.  Another great thing about this soup is it's basically dump and stir, let is simmer for a bit, and enjoy!

Ingredients:

  • 2 tbsp olive oil
  • 1 clove garlic, minced
  • 1/2 yellow onion, diced
  • 1 c. baby carrots, diced (we often get these in the free lunches from the school district)
  • 1 14.5 oz can diced tomatoes
  • 2 8oz cans tomato sauce
  • 2 c. beef stock or water
  • 1 c. baby kale salad mix
  • 1 tsp dried basil and oregano
  • salt and pepper

Directions:

  1. Add oil to a medium dutch oven or pot on medium heat.
  2. Add garlic, onion, and carrots.  Saute, stirring frequently to not let the garlic burn.  Saute until the onions become translucent.
  3. Season with salt, pepper, oregano, and basil.  Stir.  Saute for another 2-3 minutes.
  4. Add diced tomatoes and sauce.  Stir until well combined.  Add stock or water.  Check seasonings and adjust accordingly.
  5. Bring to a low boil, then turn heat down to a simmer.  Simmer for 10 minutes.  Stir periodically during the 10 minutes.  Add baby kale mix and simmer for another 2 to 3 minutes.  You are now ready to enjoy!  
Feel free to serve with your favorite grilled cheese, a side salad, or as an appetizer to your pasta dinner.  Any leftovers would be a great base for a pasta sauce.  You may need to thicken it a bit.  

Want it creamy?  Add some heavy cream or half and half while it's simmering.  I have added oat milk before too as this recipe can be all dairy free.


Wednesday, July 8, 2020

Avocado Toast


    I started making Avocado Toast last year sometime.  My daughter and I love it!  We are also huge fans of guacamole, and normally when I buy avocados, I use them to make guacamole and not think until after the fact about making avocado toast.  When making the Avocado Toast, I would normally slice the avocados into thin strips and fan onto the toasted bread.  Sprinkle a little of the ever popular "everything bagel seasoning" on top, scramble up some eggs, and call it breakfast.  Since I have begun making the avocado toast as it's pictured above, I will not go back to my old ways.  😂

    What's so spectacular about this version?  LIME!  I peel and dice the avocados, mash up with a fork, add some salt and pepper, and the juice of a fresh lime.  It gives the avocado some zing, and makes it that much more delicious!  

    Another aspect of this dish that is so lovable?  It's a quick go-to breakfast idea when you don't have a lot of time in the mornings.  While the bread is in the toaster oven, I'm getting the avocado prepped and getting the eggs ready to scramble.  I can generally get that taken care of before my toast is ready.  Quickly scramble the egg and mash the avocado, spread the avocado onto the toast, sprinkle with the everything bagel seasoning, serve with the eggs, and you're done!  I will add that the eggs are optional.  The toast itself can be filling.

    Now, before we get to the recipe, let's talk about the bagel seasoning quickly.  I am a huge fan of the "Everything But the Bagel Seasoning" from Trader Joe's.  When I shopped there more regularly, it was always on my list.  Lately I've been trying to limit my trips to any grocery store, and Aldi is our frontrunner.  Luckily enough, Aldi also has an everything bagel seasoning that is amazing, just like the TJ's version.  You will not be able to tell the difference.  I'm not telling you to buy one or the other, just some helpful advice if you're on a budget.

Ingredients:

  • two pieces of wheat bread, toasted
  • 1 avocado, diced
  • 2 eggs, scrambled
  • 2 tbsp milk
  • 2 tbsp butter
  • salt and pepper
  • juice from one lime
  • Everything Bagel Seasoning
  • fresh fruit on the side

Directions:

  1. Toast bread at your favorite setting.
  2. While the bread is toasting, slice avocado in half, remove pit.  Score the flesh with a knife to a diced cut.  Scrape flesh into a small mixing bowl with salt and pepper and juice from one lime.  Mash with a fork.  Set aside.
  3. Crack eggs into a small mixing bowl.  Add 2 tbsp milk and salt and pepper.  Whisk until well combined.  Add butter to a small skillet on medium heat.  Once butter has melted add the eggs.  Scramble using a spatula, gently pulling eggs to the middle until cooked.
  4. Remove toast from the toaster oven.  Spread avocado on the toast and sprinkle everything bagel seasoning.  Serve with the eggs and fruit.  Enjoy!

P.S. I Love You and Postscript


    When I finished P.S. I Love You, I knew I needed to start reading Postscript immediately.  I fell in love with the characters in these books.  I must live under a rock, because I never saw the movie, although so many have.  Ahern captivates you from the very beginning thinking that you are actually apart of Holly and Gerry's lives.

    I found myself thinking about what Holly would do next, about the next letter she would receive from Gerry, how would she continue to move on through this journey.  Postscript picks up 7 years after Gerry's death, and Holly is once again swept back into her old feelings.  I was impressed how Ahern developed her characters throughout both books, sharing with the readers their lives, memories, families, and more.  

    If you are ready for a love story that will stand the test of time, these books are for you!  They were both quick and easy reads, mainly because I was so immersed into them.  Thank you Cecelia Ahern for bringing Holly and Gerry to life, even in the afterlife.

Tuesday, July 7, 2020

Aglio e Olio Pasta


Who's ready for a quick, easy, and inexpensive pasta dish?  Me!!! This dish sounds fancier than it really is!  In a nutshell: cook the pasta to package directions, saute minced or grated garlic in olive oil, add red pepper flakes, drain pasta, add to pot with garlic and red pepper.  Toss with fresh parsley and parmesan cheese.  Now that are garden is going strong, I use the parsley from there, but during the winter months, I will buy fresh parsley.  I always keep dried parsley on hand, just in case.  

    I should add feel free to use your favorite cut of pasta!  This dish is extremely versatile that I've made it with angel hair, rigatoni, and orzo.  This would also be great with tortellini.  Super simple and quick meal!!  

    This recipe feeds our family of six as a side with a little leftover.

Ingredients:

  • 1 16 oz box of angel hair pasta or your favorite cut of pasta
  • 1/2 c olive oil
  • 2 cloves of garlic, grated or minced...your preference
  • 1/2 tsp red pepper flakes
  • 1/4 c fresh parsley, chopped (dried parsley is just fine)
  • 1/2 c parmesan cheese

Directions:

  1. Cook pasta according to package directions.  Drain.  
  2. Add 2 tbsp of olive oil to the pot used to cook the pasta.  Turn to medium heat.  Grate garlic over pot into the oil or add minced garlic.  Saute until slightly brown.  Add red pepper flakes.  Return pasta to the pot.  Add remaining olive oil, parsley, and mix well.  Add parmesan.  Mix again.  Serve!  This pasta is fantastic hot or cold!  
    I usually serve this with chicken, steaks, meatballs, or pork chops. Sometimes I'll add a scrambled egg and a little bacon for a carbonara breakfast.  

Pictured: Aglio e Olio Orzo with Quick and Easy Meatballs in Marinara Sauce

Homemade Pizza


    I LOVE Homemade Pizza nights.  Yes, it's always fun to get pizza delivered from your favorite pizza place, but nothing beats homemade pizzas when you can cater your pizzas to what your kids like.  When I make our pizzas, I start making the crust in the afternoon.  Don't panic!  It's a very easy pizza dough with only 4 ingredients...YES 4 INGREDIENTS!!!  The link for the dough is included below.  I'm not saying that you can't use flatbread, store bought pizza doughs, or even tortillas for your pizzas, but this dough is so easy to make and cheap, I just make our own.  The dough yields 3 doughs to make three separate pizzas.  If you don't have a reason to make 3, save the dough in the fridge overnight and use to make bread, empanadas, or anything else you can think of for it.

    Now, let's talk about toppings.  What are your favorite toppings?  When we have homemade pizza, we can have up to four pizzas at a time.  Why the madness you ask?  Because everyone has different tastes and I try to make the pizzas they like.  I will often ask for the kids help when making the pizzas and they have fun doing it.  So, what are our toppings?  The old standards of sausage and pepperoni, Hawaiian pizza (ham and pineapple), BBQ chicken, meatlovers, and more.  It could change from one time to the next.  

    I also make it easy on myself and will use jarred pasta sauce.  I usually buy that instead of pizza sauce since it's cheaper and we always have it on hand.  I don't use one brand or variety in particular, but I will say it's usually the Aldi sauce.  If we have it, or if I'm feeling up to it, I'll make an Alfredo sauce to use as a sauce as well.  I've also used pesto. And here I go, blowing your mind again.  When I add cheese to our pizzas, it's cheese that I bought in the block form and shredded in our cuisinart.  I will make my own combination of half sharp cheddar and half mozzarella.  

    Once you make your own pizza, you won't want to go back!  The possibilities are endless.

Ingredients:

  • Homemade Pizza Dough by Giada de Laurentiis
  • 1 jar of favorite pasta sauce (red sauce or Alfredo sauce)
  • Choose one or all...it's up to you!!
    • ground sausage
    • pepperoni
    • sliced ham lunch meat
    • 1/2 can of pineapple chunks, cut in half and drained
    • 2 chicken breasts, diced
    • shredded cheese (regular and/or dairy free)
    • olive oil
    • your favorite pizza toppings

Directions:

  1. Start the dough early in the afternoon.  It will need time to rise.  Once the dough is prepared, if you have pizza stones, put them in the oven as you preheat your oven.  The pizza stones are great when making homemade pizzas.  They give the bottom of the crust a little extra crunch.  Set oven temperature to 400 degrees. 
  2. Place sheets of parchment paper on the stones and/or baking sheets.  Carefully transfer dough to stone and/or baking sheets.  Using a fork, poke holes all around the crust to let the air escape.  Drizzle olive oil on the doughs and place in the oven for 8-10 minutes.
  3. Prepare the toppings!  In a medium skillet on medium high heat, add 2 tbsp of olive oil.  Brown the sausage.  Once the sausage is cooked, remove from the skillet, set aside.  Add a bit more olive oil, add the chicken.  Brown the chicken and season with salt and pepper.  Set aside.  Drain the pineapple chunks and slice in half.  Set aside.  Slice the ham lunch meat into thin strips, set aside.  Dice or slice any veggies you would like to add to your pizzas.  Set aside.
  4. Remove doughs from the oven, top with sauce and your toppings of choice.  Add shredded cheeses.  I make two with dairy free cheese and two with regular cheese.
  5. Place pizzas into the oven.  Bake for 10 minutes to melt the cheeses and fully cook the dough.
  6. Remove from the oven.  Allow to cool for 5 minutes before cutting.  Use a large knife or pizza cutter for your pizzas!  Enjoy!!!
Dairy Free Pepperoni Pizza

Chicken Pizza with Sliced Ham, Diced Red Onions, Fresh Basil

Half Meatlovers and Half Pepperoni

Wednesday, July 1, 2020

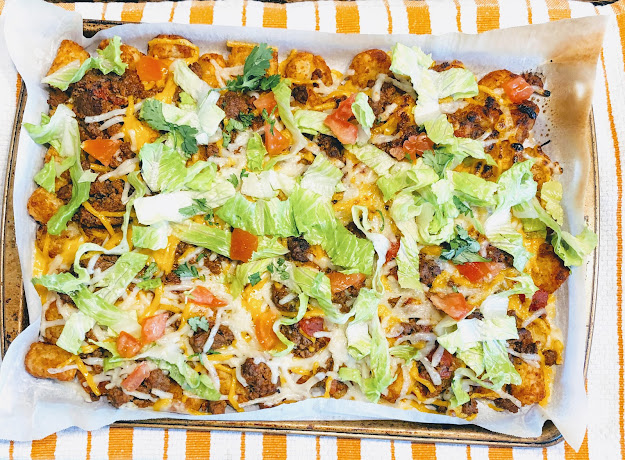
Taco Tuesday "Tot"chos


Taco Tuesday "Tot"Chos with Mexican Coleslaw


    Every Tuesday we switch things up for "Taco" Tuesday.  This week I made "Tot"Chos.  We made two versions, one with dairy and the other non-dairy.  They were delicious!!  Nicky helped me assemble the non-dairy version, including making the cheese sauce for his and Emma's "tot"chos.  In this link I will share with you both versions, as they are pretty much identical with the major difference being dairy.

    First, I will make the tater tots according to the package directions.  Cooking them all the way through, even a little longer, will help to avoid them getting too soggy.  Don't despair, some will still get soggy from the meat and the cheese, but not as bad.  I brown the ground beef and add the seasonings.  Easy enough.  In our family, a 3 lb. log from Aldi is our go-to when making anything with ground beef.  When we have burgers though, two logs are needed.  I will use the beef for making taco meat, sloppy joes, meatloaf, burgers, meatballs, and more!  In this case, it was the taco meat.  

    Seasoning the beef with a taco seasoning blend is easy!  I shy away from using the packets because I like to control the salt.  Don't get me wrong, I definitely don't skimp on the salt, but it's hard to gauge the amount when using a prepackaged blend.  Having chili powder, cumin, paprika, onion and garlic powder are staples in our house.  We I also have an old jar of Wahoo! Chili from Pampered Chef that I'm trying to use up, so I use a little bit of that once in awhile.  I hate to waste things, that's why I also do my best to reinvent leftovers.  

    Next, after the meat is cooked and seasoned and the tater tots are ready, I spread the cheese sauce on the tater tots, followed by the meat, then top with another layer of cheese!!  Shredded cheese this time!  When making the non-dairy version, we make a cheese sauce with oat milk and non-dairy shredded cheese.  It gets thick, so no needed to thicken at all.  It will need to be seasoned with salt and pepper.  The dairy cheese sauce has milk, Velveeta chunks, shredded cheese, and salt and pepper.  Sure, it's easy to open a jar and pour, but we prefer it homemade.

    Finally, put your pan/s in the oven at 400 degrees for 15 minutes.  Everything will get bubbly and gooey.  DELICIOUS!!  Before serving, I will top the "tot"chos with shredded lettuce, tomatoes, green onions, and cilantro.  We have guacamole and our cream on the side.  Feel free to top with your favorite taco or nacho toppings.

This recipe serves 6.

Ingredients: (with dairy)

  • 2 tbsp olive oil
  • 3 lb. ground beef
  • 1/2 yellow onion, diced
  • 3 tsp each of chili powder, paprika, cumin, garlic powder
  • 1 8oz can tomato sauce
  • 1 15 oz can diced tomatoes
  • salt and pepper
  • 2 pkgs tater tots
  • 1/2 brick of prepared soft cheese (I use the Clancy's brand from Aldi)
  • 1 c. milk
  • 2 c. shredded cheese: mix of cheddar and mozzarella
  • cornstarch slurry (if needed to thicken sauce)
  • shredded lettuce, diced tomatoes, cilantro, green onions

Ingredients: (NON-dairy)

Replace all dairy products with the following:

  • 1 c. oat milk
  • 1 c. non-dairy shredded cheese: mix of cheddar and mozzarella

Directions:

  1. Preheat the oven to 425 degrees.  Cook the tater tots according to package directions and your oven.  Leave the tots in the oven for 5 extra minutes to continue to cook and get crispy.
  2. Preheat large skillet with oil.  Add ground beef.  Break into small pieces and season with spices, salt and pepper.  Drain.  In any remaining oil/grease in the skillet, saute the onions.  Once onions are translucent, add the meat back to the pan with tomatoes and sauce.  If the mixture becomes too thick as it's cooking, add 1/2 c. water to thin it out.  Continue to stir and allow to simmer for 5-10 minutes.
  3. As the meat is cooking prepare the cheese sauce.
    1. Dairy version: Add milk to a medium size pot.  Bring milk to a low boil. Keep your heat low so as not to scald the milk.  It could brown at the bottom of your pan.  Once the milk is at a low boil, add the prepared cheese in large chunks.  This will help it melt more evenly.  Stir constantly to avoid sticking.  Once all of the cheese is melted, slowly add 1 cup of the shredded cheeses.  Stir well to combine.  Don't leave the sauce unattended or it will burn.  Season with salt and pepper.  When the shredded cheese has melted, if the consistency of the sauce is too thin, make a cornstarch slurry of equal parts of cornstarch and water.  Whisk into the sauce to combine.  Remove from heat.
    2. Non-dairy version: Add oat milk to a medium size pot.  Bring milk to a low boil. Keep your heat low so as not to scald the oat milk.  It could brown at the bottom of your pan.  Once the oat milk is at a low boil, add 1 cup of the non-dairy cheeses.  Stir constantly to avoid sticking.  It will take some time for all of the cheese to melt.  It doesn't melt as quickly as regular cheese.  Don't leave the sauce unattended or it will burn.  Season with salt and pepper.  Remove from heat.
  4. Time to layer!  Remove the tater tots from the oven.  Reduce the oven temperature to 400.  Coat the tater tots with the cheese sauce.  Top with the taco meat.  Layer on the remaining shredded cheeses.  Place in the oven for 15 minutes, or until the cheese sauce is bubbling and the shredded cheese is melted.  FYI: If you are making the non-dairy version, the shredded cheese won't fully melt.
  5. Remove the "tot"chos from the oven.  Add your favorite nacho toppings!  We add shredded lettuce, diced tomatoes, diced green onions, and chopped cilantro.  Sour cream, guacamole, and pickled jalapeños are on the side for anyone to add to their own plates.  ENJOY!
NON-DAIRY VERSION OF "TOT"CHOS