 |
| Easy Tomato Soup If you're like me, you grew up on Campbell's Tomato Soup and grilled cheese sandwiches. I remember those days fondly when my mom would heat up the soup with a can of milk added and one of her delectable Kraft American Cheese grilled cheese sandwich cut into four triangles. How many of you dipped your grilled cheese into your soup? I know I did, and still do to this day!! I had a taste for tomato soup the other day and decided to make my own. I've upgraded quite a bit from the days of canned soup to create this quick and easy version of tomato soup. It's easy enough to put together before lunch and be ready to enjoy within 30 minutes. Feel free to make yourself a grilled cheese to bring you back to your childhood!! Easy Tomato SoupIngredients:
Directions:
In the picture below I included beef broth, which can be used instead of water for more flavor as well as half and half to make the soup creamy. In the recipe above I did not include those, but feel free to add.     |
-
 Family Life
 -
 Recipes
 -
 Book Reviews
Monday, May 25, 2020
Such a Fun Age by Kiley Reid Book Review
 I have wanted to read this book for quite sometime now. It's been sitting on my TBR (to be read) shelf of library books that are sitting patiently and waiting to be read. Our library has been closed since March. For those of you like me, you will be able to relate, but I've been having library withdrawal. This TBR shelf has also turned into a storage shelf of the books that I read that need to be returned to the library. Since the libraries in our area have been closed, no one is counting late fees or any penalties during this time. THANK GOODNESS or I'd owe a pretty penny right now.
 Such a Fun Age is Kiley Reid's debut novel, and I must say I'm ready for her next one. The main character in this coming of age novel, Emira Tucker, has been hired as a babysitter for a fairly affluent family who is adjusting to life in Pennsylvania from New York City. Shortly into the book, Emira is faced with the possible charge of kidnapping and then dealing with the effects of that night throughout the book. Simultaneously we learn the story of Mrs. Alix Chamberlain, Emira's boss, and her process of dealing with the potential kidnapping while trying to still be as successful in PA as she was in NYC.
While I did not directly relate to Emira and her story as a 25 year old not really knowing what she wanted to do with the rest of her life, but I find myself in that situation now as a 41 year old. I'm at a point in my life that after 18 years of teaching or being an administrator, I'm in need of a change. Over the past year I've become a stay at home mom largely in part to my PTSD diagnosis, but as the healing process continues, I'm getting ready to find a new path for my career. What that will be I'm not yet sure, but I continue to pray for guidance and support each day.
Emira's story is quite different. While she doesn't know what she wants to do, she realizes she needs a steady job that will offer her benefits. In the book she turns 26, and at that point, she believes she will no longer be able to babysit even though she has fallen in love with Briar, or will she?
I believe you will truly enjoy this book. For me, it was a book I couldn't put down. Every chance I had, I wanted to read more. I'd be falling asleep at night, nodding my head, trying to finish a chapter because I couldn't wait to find out what would happen next. Reid developed her characters throughout the book in a way that was easy to identify with them. If this book is not on your list of "To Be Read" I suggest you add it! You will enjoy it!
Hawaiian Chicken Kabobs with BBQ Dipping Sauce
Emma has been asking for quite some time to make this recipe! The girl LOVES pineapple. She really likes pineapple pizza. When we have "Make Your Own Pizza" nights for dinner, her go to pizza is diced ham and pineapple. I am so blessed to have children that are not picky eaters. I truly believe that it is in part our doing that we don't have picky eaters. The children are told that they need to try everything that is served for dinner that night. There is always plenty for them to eat on the table if there is something they try that they don't like, but we want to expose them to new things and we ask that they try whatever it is that is new. 9 times out of 10 they like what they try so we add it to our repertoire. These kabobs are a perfect example. Not everyone likes peppers, so if they don't like the pepper, they have the chicken and pineapple to eat, and oftentimes someone else will take the peppers the other one didn't eat. Works out perfectly!

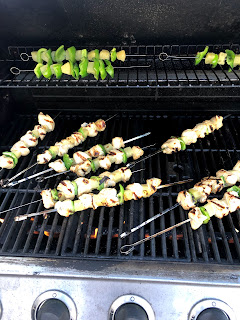
When we serve the kabobs for dinner, we take them off of the skewer and serve. This what no one gets poked with the tip, and makes it easier for the kids to eat and not have to struggle with the skewer.
I will often prepare these in advance, after marinating the chicken in the hawaiian teriyaki sauce for a couple of hours. You can save the sauce to use to baste the kabobs while they are cooking on the grill.
This recipe will serve 6.
Ingredients:
- 3 large chicken breasts, cut into 1 in. pieces
- 1 15 oz. can diced pineapple with juice
- 2 green peppers, cut into 1 in. pieces
- 14 skewers
- 1/2 c. soy sauce
- 1/2 c. olive oil
- 2 tbsp honey
- 1 tsp ginger, ground
- 1 clove garlic, grated
- salt and pepper
Directions:
- Add pineapple juice from the can of diced pineapple, then soy sauce through salt and pepper into a large bowl. Whisk to combine. Add chicken pieces to bowl. Marinate for about 2 hours.
- While the chicken is marinating, cut the green peppers into 1 in. pieces.
- Make kabobs. There is no set way to make the kabobs, just be sure to alternate between chicken, pineapple and peppers, pictured above. We had 5 pieces of chicken on each skewer, but 4 would be just fine.
- While you are preparing the kabobs, if you will be serving right away, preheat the grill. You can make the kabobs in advance and store, covered in the fridge until you are ready to grill.
- Place kabobs on the heated grill. Rotate kabobs every 5 minutes or so. This will allow for even cooking and grill marks on the chicken, et al. We did have a few kabobs that were only peppers and pineapple. I didn't grill them on the direct heat, but placed them in the rack above. This allowed them to heat through, but not cook that much faster than the chicken.
- Use the remaining marinade the baste the chicken during cooking. Be sure to allow marinade to cook on the kabobs after basting due to the raw chicken juices. Save some to make the BBQ Dipping Sauce.
- We didn't have any left to make a BBQ dipping sauce, but if you do, you MUST cook it because there was raw chicken in it. To make the BBQ Dipping Sauce combine 1/2 c. ketchup, 1/2 c. BBQ sauce, marinade (if you don't have marinade add 1/4 c. soy sauce and 2 tsp. lemon juice and 1 tsp honey) to a small sauce pot. Bring to a low boil. Stir well to combine. Reduce heat to a simmer. Simmer for 5 to 10 minutes to thicken. Serve as a dipping sauce on the side with the kabobs.
 |
 |
| Hawaiian Chicken Kabobs, BBQ Dipping Sauce, and Teriyaki Pasta Salad |
Teriyaki Pasta Salad
 |
| Hawaiian Chicken Kabobs with Teriyaki Pasta Salad Have you ever searched for a recipe and couldn't find what you are looking for? Thinking all the while that your idea for a recipe is definitely feasible and you're wondering why no one has thought of this before? That's what happened to me for this recipe. I found a couple of recipes that were similar to what I was thinking, but not exactly what I wanted. When making my recipes, I always look to see if there is something out there that has been done before similar to what I was thinking, but I will always change the recipe up to make it my own. When developing recipes, I focus on the tastes of my family and think of their likes and dislikes to make sure they will enjoy what we are having for dinner, lunch, breakfast, etc. It's important for me to make what they like, but still challenge their pallets to often try new things. Since we like teriyaki flavors, why not create a pasta salad to go along with our dinner? Teriyaki Pasta SaladIngredients:
|
Directions:
- Cook pasta according to package directions. If you are using frozen green beans, add to pasta close to the end of it's cooking time, with 2 to 3 minutes remaining. Drain and run under cool water. This will help to remove excess starch on the pasta and avoid stickiness of the pasta.
- Add olive oil through salt and pepper in a large bowl. Whisk to combine. Add remaining ingredients to bowl including pasta and green beans. Toss all to combine. Serve immediately. You can store in the fridge for up to two hours. Enjoy!!
 |
| Teriyaki Pasta Salad |
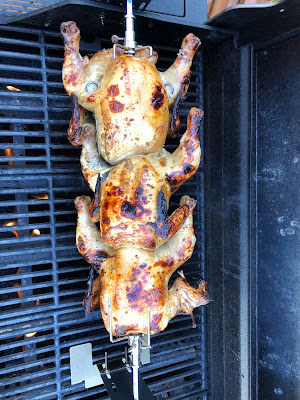
Rotisserie Chicken and Chicken Marinade

Chicken Marinade (the recipe is written for a whole chicken)
Ingredients:
- 1 c. olive oil
- 1/2 c. soy sauce
- 1/2 c. white wine vinegar
- 1 tsp red pepper flakes
- 2 cloves garlic, grated
- 1/2 c. lemon juice
- 1/2 c. honey
- 1 tsp. thyme, dried
- 1 tsp. oregano, dried
- 1 tsp. paprika
- salt and pepper
- 1 -2 whole chicken(s), I made three because they were small and we are big eaters!
Directions:
- Add ingredients in a large metal or glass bowl. Whisk until well combined.
- Trim any excess skin or unnecessary parts of the chicken. Place chicken carefully into the bowl. Cover with plastic wrap. Place in the refrigerator on the bottom shelf, if possible, for 2 to 24 hours. Rotate chicken every couple of hours to develop the flavors.

Chicken is marinating. - Remove chicken and you are ready to cook!
*Note: Remember, you can use this marinade for any type of chicken you'd like. It's versatile.
Are you ready now for the rotisserie part? This is super easy! All you have to do is place your chicken .
Place your marinated chicken on the rotisserie. Attach it to the grill...let it spin! You'll have to check your chicken for doneness, but no worries! Just be sure to have your handy kitchen thermometer ready to check various parts on the chicken. You'll want to check the legs as well as the breasts. They don't often cook at the same speed. Your chicken is done when all sections read 165 degrees.


 |
| Time for dinner! |
Dairy Free Ranch Dressing

Serve it with your favorite salad, I'd suggest a Cobb Salad, or even as a dip for breaded chicken. Serve on a sandwich or simply a quick salad you have for dinner that night. However you choose, to it will be the best!
Ingredients:
- 1 c. mayonnaise, I make my own
- 1/2 c. olive oil
- 1/2 c. apple cider vinegar
- 1 clove of garlic, grated
- 1 tbsp fresh parsley, chopped
- 1 tsp onion powder
- 1 tsp dill, dried
- salt and pepper
Directions:
- Combine ingredients into a small bowl. Whisk until well combined. Serve! It will stay in an airtight container in the refrigerator for up to one week.
Thursday, May 21, 2020
Southwestern Chicken Wraps
 |
| Southwestern Chicken Wraps |
I've said this before, but my family LOVES "Taco Tuesdays." In an effort to change things up each week, we don't always have the typical taco, but incorporate fajitas, enchiladas, burritos/wraps, and a variety of different tacos. On this week's menu, Southwestern Chicken Wraps. What's the connection to "Taco Tuesday?" The "southwestern," of course! I seasoned the breading for the chicken with spices I would normally use in my chili, Emma made fresh salsa, and we had a Zucchini and Corn Succotash. In this recipe for the wraps, I will show you how easy it is to bread chicken breasts/tenders. Once you learn the method, the possibilities are endless for the protein you decide to serve and coat with breadcrumbs!
So to briefly explain, breading should be done in three steps. I cannot stress how important it is to season each layer of breading, starting with the flour, following by egg, and finally the breadcrumbs.
 |
| Seasonings for breaded chicken |
Because we have two kids who can't eat dairy, I add a little oat milk to my egg mixture for the second layer of breading. I have three eggs ready for this recipe because I had a lot of chicken, don't forget we have 6 people to feed in our family, but normally I'd suggest only 2. So, are you ready to get your hands messy? Here's also an extremely helpful tip, I will often bread my protein (usually chicken) earlier in the day which frees me up some at dinner time, just prepare a baking sheet with parchment paper 1) so you have a landing spot for your chicken after it's breaded and 2) to prepare ahead of time and put in the fridge until you are ready to fry it, air fry it or bake it.
Ingredients:
- 2 to 3 lbs chicken tenders or chicken breasts sliced into chicken tenders
- 1/2 c. flour
- 3 c. breadcrumbs
- 2 to 3 eggs, scrambled with 2 tbsp oat milk (feel free to use cow's milk)
- 1 tbsp chili powder
- 2 tbsp Season Salt
- 1 tbsp cumin
- 2 tsp paprika
- oil for frying, optional
- 4 large tortillas
- shredded lettuce
- shredded cheese
- Southwestern Dressing, recipe below
Directions:
- Combine seasonings in a small bowl and line baking sheet with parchment paper.
- Before breading, you will need three shallow bowls or deep plates to house the flour, eggs, and breadcrumbs. I use a dinner plate for the flour and 2 9 in. pie plates. One for the egg and the other for the breadcrumbs.
- If you are cooking the chicken immediately, preheat veggie oil in a shallow plan. You will need enough to cover at least 1 side of the chicken pieces, to brown and cook one side of the chicken piece at a time. I typically air fry the breaded chicken. If you are air frying or baking immediately, preheat the oven or air fryer to 400 degrees.
- Whisk the eggs together with the milk, and season each stage of breading with the spice mixture to evenly distribute the flavor and seasoning of the chicken. Only seasoning the breadcrumbs will not season the chicken. You must season the flour and the egg to also season the chicken.
- Coat each piece of chicken, one at a time, with flour, then with the egg mixture, lastly the breadcrumbs. Put the breaded chicken pieces on the baking sheet while you are breading each other piece.
- Once you've breaded each piece, you can stop at this point and store the chicken in the fridge until you are ready to cook them. If your ready to cook the chicken, test the oil temp, by dropping a few breadcrumbs into the oil. If the oil bubbles, it's ready. If not, turn up the heat and wait a couple of minutes. DO NOT crowd the pan. If you place too many chicken pieces into the pan, the oil temperature will drop too quickly and you will not fry them evenly. They will also not brown well.*
- If you are air frying or baking, put your chicken into the air fryer or oven for 20 minutes. REMEMBER! The chicken MUST be at 165 degrees to be fully cooked.
- Once your chicken is cooked, place two pieces in the center of a large tortilla. Top with shredded lettuce, shredded cheese (regular or dairy free), and Southwestern Dressing. Fold in the sides of the tortilla, pull the bottom of the tortilla over the chicken and toppings. Roll to close. Repeat 3 more times.


*If you are frying your chicken in batches, set your oven to 300 degrees to keep them warm while you fry each batch. This will also help to fully cook the chicken. Then when you are ready to serve, your chicken from the first batch will still be hot.
Southwestern Dressing
Ingredients:
- 1/2 c. homemade or store bought salsa
- 1/4 c. mayo
- 2 tbsp olive oil
- salt and pepper
Directions:
- Combine ingredients in a small bowl. Whisk and serve. Store in a sealed container in the refrigerator for up to a week. Include dressing in Southwestern Wrap or use for coleslaw dressing with shredded cabbage. Can also be used as a dip with tortilla chips.
Daughter of Moloka'i Book Review
Has anyone read this yet? I finished it last week. I read it through a combination of audio book as well an on my Kindle. I do have to admit that I did not read the first book, Moloka'i, which is now on my list, even though I'm reading them in reverse order. Not having read the first book, I really was not "missing" anything, or wondering what the book is all about. While it would have been smart to read through the first book first, the author did a tremendous job of developing his character and providing a balance between Asian and American cultures.
 |
| Daughter of Moloka'i by Alan Brennert |
As the book title eludes, the book was about the daughter of the original character from the first book. We meet Ruth, who took us through her journey of adoption while exploring the story of her origin, yet staying true to her family. As I pointed out above, Brennert demonstrated a balance between Hawaiian and Japanese cultures of the evolution of our American culture being shaped by World War II.
I thoroughly enjoyed this book, mainly because I love to read historical fiction novels. Brennert provides detailed accounts of the hardships the Japanese experienced when coming from Hawaii to the contiguous states, mainly California right before the Great Depression and through World War II. While travel at that time was difficult for many ethnicities, Brennert took us on the journey of Ruth, being a adopted at the age of 5 in Hawaii, being raised on a strawberry farm, marriage, and reunion with her birth mother, Rachel.
I sincerely hope you enjoy reading this book as much as I did. I've read many other historical fiction books, but never any that have provided such detailed accounts of the life of Japanese and their lives during the war living in America.
Tuesday, May 12, 2020
Quick and Easy Meatballs in Marinara Sauce
 |
| Quick and Easy Meatballs in Marinara Sauce |
Yields: 24 golf ball size meatballs
Ingredients:
- 2 lbs of ground beef
- 1 lb ground pork, if you can't find ground pork, use 3 lbs of ground beef
- 2 eggs
- 1 c. breadcrumbs
- 2 cloves fresh garlic smashed, sliced, and minced
- 1 c. fresh parsley, minced
- salt and pepper
- 1 jar marinara sauce
- 1 tbsp olive oil
- 1/2 medium onion, diced
- 2 cloves fresh garlic smashed, sliced, and minced
- 1 tsp dried oregano
- 1 tsp dried basil
Directions:
- Preheat oven to 400 degrees. Prepare a baking sheet with foil and cooking spray. Combine ingredients through salt and pepper in a large bowl. Use your hands to thoroughly combine the meat with the other ingredients.
- Once everything is well combined, start to form meatballs. To get the meatballs all around the same size you can use an ice cream scoop to form them. Place meatballs onto baking sheet. Bake the meatballs in the oven for 30 minutes. While the meatballs are baking, begin to prepare the marinara sauce.
- Heat oil in a large skillet. Add onions and garlic and saute. Season with salt and pepper, oregano and basil.
- When the onions start to turn translucent, add the jar of sauce. Add a little water to the jar, cover, shake to get the remaining bits of sauce in the jar and pour into the skillet. Season with salt and pepper. I also add a little sugar since the jarred sauces tend to be bitter.
- Allow sauce to come to a low boil, stir often. Reduce heat to simmer.
- Remove meatballs from the oven. If there is a lot of grease on your baking sheet, before transferring the meatballs to the sauce, place them on a paper towel to soak up some of the grease as to not add it to the sauce.
- Allow meatballs to soak up the sauce for 5 minutes on a low heat. Ready to serve over pasta!

Note: These can easily be a make ahead recipe. I've often made the meatballs ahead of time. Sometimes I've prepared them, placed on the baking sheet, covered and put into the refrigerator for later in the day. I've also baked them and allowed to cool completely before putting into the sauce to warm through. These meatballs also freeze well. Prepare through step 7, just allow to cool completely. Add to a freezer safe container and freeze up to one month.
Easy Egg Rolls/Deconstructed Egg Rolls Two for One Recipe!
 |
| Easy Egg Rolls with Orange Chicken and Asian Slaw |
Making egg rolls always seemed like a very daunting task. It was so much easier to buy frozen egg rolls, pop them in the air fryer and call it a day, or so I thought. David said we should make our own eggs rolls. They are extremely easy, just time consuming. The daunting part for me was rolling the wonton wrappers. Sure, I've seen chefs rolls them on TV all of the time, but that's TV. When I really got into cooking more and enjoying it so much, I decided to give it a shot! I can tackle these little egg rolls.
I knew putting the filling together was going to be simple. The kids already love it when I make Deconstructed Egg Rolls, that recipe will be a separate post, so putting the filling together would be to follow that recipe. For us, ground turkey is cheaper than ground pork, so I generally use ground turkey in my deconstructed egg rolls, a.k.a. filling. When I see ground turkey on sale, I stock up. It doesn't go on sale all too often, but I take advantage when it does.
Have you begun to relax a little and think, hey! I can make these! Make them to have alongside your Chinese food dinner, as an appetizer for a party or fun appetizer dinner, or even lunch. A little secret...I prepared and rolled them in the morning, put them in the freezer, pulled them out as I preheated my air fryer oven, and put them in the air fryer when it was ready. You can definitely shallow fry these, but I try to use our air fryer as often as possible.


 |
| Seasonings and spices for egg roll filling |
 |
| Getting ready to roll! |
 |
| Follow the pictures below to roll the egg rolls |


From this point, depending on when I make the rolls, I will either start the air fryer or place in my freezer on a flat surface (so they don't roll). Remove from the freezer about 10 minutes before cooking, while your oil is heating your the air fryer is preheating.
I was so intimidated when thinking about making my own egg rolls, I never figured I would be able to accomplish it so easily. We LOVE egg rolls, and we also LOVE Deconstructed Egg Rolls which is the egg roll filling in this recipe over rice. This is why I'm calling this a two for one recipe for you!
Ingredients:
- 1 tbsp sesame oil
- 1 lb ground turkey or pork
- 1 bag coleslaw mix
- 1 tsp ground ginger
- 1 tsp garlic powder
- 1 tsp onion powder
- 2 green onions, diced
- 1 tbsp honey
- 2 tbsp rice wine vinegar
- 1/4c. soy sauce
- salt and pepper
- 1 pkg wonton wrappers
- Sweet Chili Sauce, optional
Note: If making this as the Deconstructed Egg Rolls, double to recipe and make two cups of rice to serve with your mixture.
Directions:
- Add sesame oil to a skillet. Sprinkle the ginger into the skillet with the oil. Brown turkey in the sesame oil over medium high heat. Season with salt and pepper.
- Once the meat is browned, added the garlic powder and onion powder. Stir to combine. Add in the coleslaw mix. The cabbage will cook down a lot. Stir to combine with the meat and cook for 2 to 3 minutes.
- Add the green onions, honey, rice wine vinegar and soy sauce. If you have it and want a little kick of spice, add the sweet chili sauce.
- Stir well to combine. Cook for another 2 to 3 minutes. Adjust any seasonings with salt and pepper. Remove from heat. (If you are not making egg rolls, this is ready to serve with rice.)
- Fill a small bowl of water to help seal the edges of the wonton wrappers.
- Prepare a baking sheet with parchment paper and spray with cooking oil so the egg rolls don't stick.
- **See pictures above!!!! Taking one wonton wrapper at a time, place it as a diamond on a clean surface. Place 1 tbsp filling into the center of the wrapper. Dip your finger into the bowl of water and line the edges of the wrapper. Fold the bottom corner up over the filling. Press edges down. Fold a side corner, then the other side corner over. Your egg roll should resemble an envelope. Fold the last corner over sealing the egg roll. Gently press to make sure no filling will leak out. Place onto baking sheet. Repeat the steps.
- You now have two options, fry/air fry the egg rolls or put into the freezer to cook later in the day. Do not freeze longer than one day if not cooked.
- If frying, heat vegetable oil into a deep skillet. The oil needs to be at at least 350 degrees to fry. When frying, do not overcrowd the skillet. Fry no more than 4 egg rolls at a time. You will need to flip the egg rolls once during the frying process.
- If air frying, set air fryer temp to 400 and cook for 15 minutes, flipping once to brown on both sides.
- They are now ready to enjoy!!!
Note: If frying, place a cooling rack on the baking sheet you used to prepare the egg rolls. This will help drain the oil after coming out of the skillet.
Friday, May 8, 2020
Mother's Day Ideas during Shelter-in-Place
There's no doubt this Mother's Day will be a lot different for all of us that those of years past. We would start the day by going to church, enjoying our time together with our friends and God. Later in the day, our parents would come over for dinner, perhaps a BBQ if the weather was nice. Unfortunately I normally don't get to spend the day with my stepchildren, but we are lucky this year, because this is our weekend, and I will be able to enjoy them being home. Having them home is gift enough for me.
 So as you may have guessed, our parents won't be coming over for dinner this year. I definitely have mixed feelings about this. I want everyone to stay safe and healthy, but it would be so nice to spend the day with my mom and David's mom, my second mom. Kinda like Easter this year, it will be just us.
 What will this year look like? We improvise! In order for us to see our moms and the kids to see their grandmas we will "drive by", blow kisses, and wave to our moms and grandmas. Since the kids are home the weekend of Mother's Day, we will celebrate on Saturday. It means so much to our moms, to see their grandkids, and we still want that to be special for them.
I'm not going to like, this time has been different and difficult for so many reasons, but we are doing the best we can to navigate this journey.
In case you are stuck, and still want to make this day special for your mom, but just don't know how? I will share a few easy suggestions for you to be able to do just that.
Mother's Day Ideas during Shelter-in-Place
1) Don't cook, support your local business for "curbside" pick-up or delivery. Want to provide a meal for your mom at her house? Order dinner for her (and your dad, of course) from her local favorite restaurant and have them deliver. I've also known families to drop meals off on their family's doorstep, so that's always a possibility.
2) Sad about not being able to eat together as a family? FaceTime during dinner. Connect with mom virtually while sharing a meal together.
3) Make cards/posters for mom! Create a homemade card or poster for your mom and drop it off with dinner, or hold up the poster as you drive by and wave. Bring mom some beautiful flowers too to brighten her day.
4) Create a "care package" for mom putting together some of her favorite treats. You can include her favorite snacks, gift card for a local restaurant, chocolates, comfy slippers, manicure set or relaxing bath items, or anything else that would be some of mom's indulgences.
5) Be artistic! Have your kids create an "Art Walk" on your mom's sidewalk with inspirational mom messages of love and support. Mom will love to read these and your kids will have fun making these artistic drawings for grandma. The bonus will be getting covered in chalk dust, NOT!
I hope these ideas help give you some inspiration for making the most out of this Mother's Day. While it will be different, we will make the best of it the way we know how! It will be special regardless of what you do, because hey, you're a mom (or mom figure), and YOU ARE A SUPERHERO!
Tuesday, May 5, 2020
Cinnamon Crunch Granola
 |
| Cinnamon Crunch Granola |
Ingredients:
- 1 1/2 c. rolled oats
- 1 c. cinnamon crunch cereal, I buy the Aldi brand
- 1/4 c. coconut oil
- 1/4 c. maple syrup
- 1 tsp. vanilla
- 1 tsp. cinnamon
Directions:
- Preheat the oven to 350 degrees. Prepare a large baking sheet with parchment paper.
- Combine the oats, cereal and cinnamon in a large bowl.
- In another small bowl add the maple syrup and vanilla. You will need to add the coconut oil to this small bowl, but it has to be melted first. If you have a microwave, place the jar of coconut oil in the microwave for 15 seconds. Stir. Return for another 15 seconds if the oil is still solid. Continue until you have 1/4 c. of oil to use. We don't have a microwave, and only had about 1/4 cup left in the jar of coconut oil, so I put the jar into a small sauce pot and filled it with a little water. I turned the water on to boil which then allowed the oil to turn to liquid. Pictures are shown below.
- Once the oil is liquified, whisk with syrup mixture. Pour syrup mixture over the dry mix, and stir to combine.
- Spread evenly onto baking sheet. Place in oven for 30 - 35 minutes, the granola should be browned slightly.
- Remove from the oven and allow to cool on baking sheet. The granola will continue to cook and harden. After completely cooled, break granola up into bite size pieces. Store in an airtight container for up to 5 days.
 |
| Ingredients for granola |
 |
| Melting coconut oil in pot of water. |
 |
| Coconut oil once melted. |
 |
| Wet and dry ingredients divided. |
 |
| Ready to bake. |
 |
| Granola cooling on the stove. |
 |
| Yummy Cinnamon Crunch Granola |
Monday, May 4, 2020
The Upside of Falling Down by Rebekah Crane

Who hasn't ever wanted a chance in life to have a fresh start? Clementine Hess is the survivor of a fatal plane crash and wakes up without any memory of who she was, including her name and family. She has set out to achieve the goal of finding herself once and the life she had, but discovers so much more along the way. In learning more about herself and conquering her fears, she believes that returning to the life she once had isn't good for anyone, especially her, or is it truly what she's missing? Yes, she's lucky to be alive. She has a loving family, or so she's told. But she can't help the feeling inside that she needs to "find herself."
We often find ourselves taking things for granted, even our day to day lives. While at times I'm sure we all wish we could have a "do-over" and change our fate or our lives. But will that be worth it in the end? What will you have to sacrifice to start over? What will change and not for the better? I have often wished for a way to start over, but I hate to lose what I have now. Clementine is almost ready to give everything up for a new life, but is it really worth the risk?
I hope you enjoy the book as I did. Learning that despite what we think, life is not always greener on the other side of things.
What's your "new normal?"
I don't know about you, but sometimes I feel like we are all extras in a remake of the movie Groundhog Day. Remember when we looked forward to the weekends, looking forward to Fridays...TGIF! Lately it seems as if each day meshes together, and I often struggle with which day of the week it actually is. Wait, it's Monday again? Here's a good analogy, we are like hamsters on a wheel going around and around and not going anywhere. I was on the phone with my mom earlier giving her a rundown of what everyone was doing. Michael finished his work for the morning and went out to cut the grass, Nicky and Matthew were playing, Emma was doing her school work, and David went to the store. "You know, a normal Monday for us," I said. What...WHAT??? This is a normal Monday? Our "normal" Mondays used to consist of all of the kids at school and David at the office. Those Mondays seem so far away in our past!
Now, our "normal" Mondays include some of the same things, the kids doing their school work through eLearning, David at the office (in our bedroom), and me? I'm working on my blog, doing housework, cooking, or reading. Have you wondered what life will become after this pandemic is under control and the stay at home orders are lifted? The kids have so many questions that we wish we could answer, but unfortunately we cannot. I'm sure you've heard many of the same...When can we see our families? When can we see our friends? Will we ever go back to school? When can we go out and do things? When this is all over, can we go out to dinner? What will happen with graduation? THAT'S A HARD ONE TO SWALLOW!
Emma is in 8th grade this year. Out of all four of the kids, she misses school the most. She is also our most avid and conscientious student. Emma works very hard and always goes above and beyond. She doesn't really show it, but I can tell she's bummed about not having an "official" graduation ceremony. Our school district is doing everything they possibly can to bring the graduation and thrill of the 8th grade year to the students. It's not the same, but I can tell you, we are going to do everything we can to make this as special as possible for Emma. She and everyone graduating this year deserves just that.
As far as some of the other questions from the kids, we answer them as honestly and forthright as we know how. We do our best to FaceTime our families so the kids can see their grandparents and vice versa. We let the kids know that the stay at home order is meant to keep them safe, and assure them that we will all be together again soon. They are able to see their friends through Google Meets during their school work for now, but soon will see everyone again.
Undeniably this is a hard time, and we are all dealing with it as we know how. While some questions remain unanswered, we have to have faith that all we will one day be able to come together and rejoice this challenging time has ended. What will our "new normal" look like? No one knows. One thing I can be sure of though, is with having my family with me I can get through anything.
Dairy Free Creamy Broccoli Cheese Soup
 |
| Creamy Broccoli Soup |
Ingredients:
- 2 tbsp olive oil
- 4 cups chopped broccoli
- 1 tsp diced garlic
- 1/2 medium onion, diced
- 2 carrots, peeled and diced
- 2 tbsp non-dairy butter
- 2 tbsp flour
- 4 cups chicken stock
- 1 cup oat milk
- 1 cup dairy free shredded cheddar cheese
- salt and pepper
Directions:
- Add olive oil to a stock pot, turn heat to medium. Once the oil is hot, add the onions and garlic and saute for about 3 minutes until onions turn translucent. Season with salt and pepper.
- Add carrots. Continue to stir the pot so the vegetables don't stick. Saute the carrots for another 3 minutes. Add the chopped broccoli. Stir. Adjust seasonings.
- Once the broccoli begins to cook down, add the butter. Allow the butter to melt and soak into the vegetables. Add the flour and coat all of the vegetables. Be sure to allow the flour to cook and all of the white of the flour to cook for a few minutes. This will remove a flour taste from your soup.
- Add the chicken stock. Scrap all of the bits from the bottom of your pot. Stir well.
- Bring the soup to a boil. Reduce the heat and add oat milk. Stir the soup.. Cover, and bring soup to another boil. Reduce heat to a simmer and cook until your vegetables are fork tender. Taste the soup and check your seasoning.
- Use an immersion blender for a smooth consistency of the soup. If you don't have an immersion blender, you may use a regular blender to achieve the same result. Add the shredded cheddar cheese to the soup and stir to combine. If you would like your soup to be a little thicker, you may add a little cornstarch with water, and whisk. Bring soup back to a boil. Allow soup to cool a few minutes before serving!
Enjoy!
Notes: Making this soup dairy free is just how I decided to make it so everyone in family can enjoy it. You can definitely use regular milk and cheese to make this soup. Using half and half would make this soup rich and creamier.
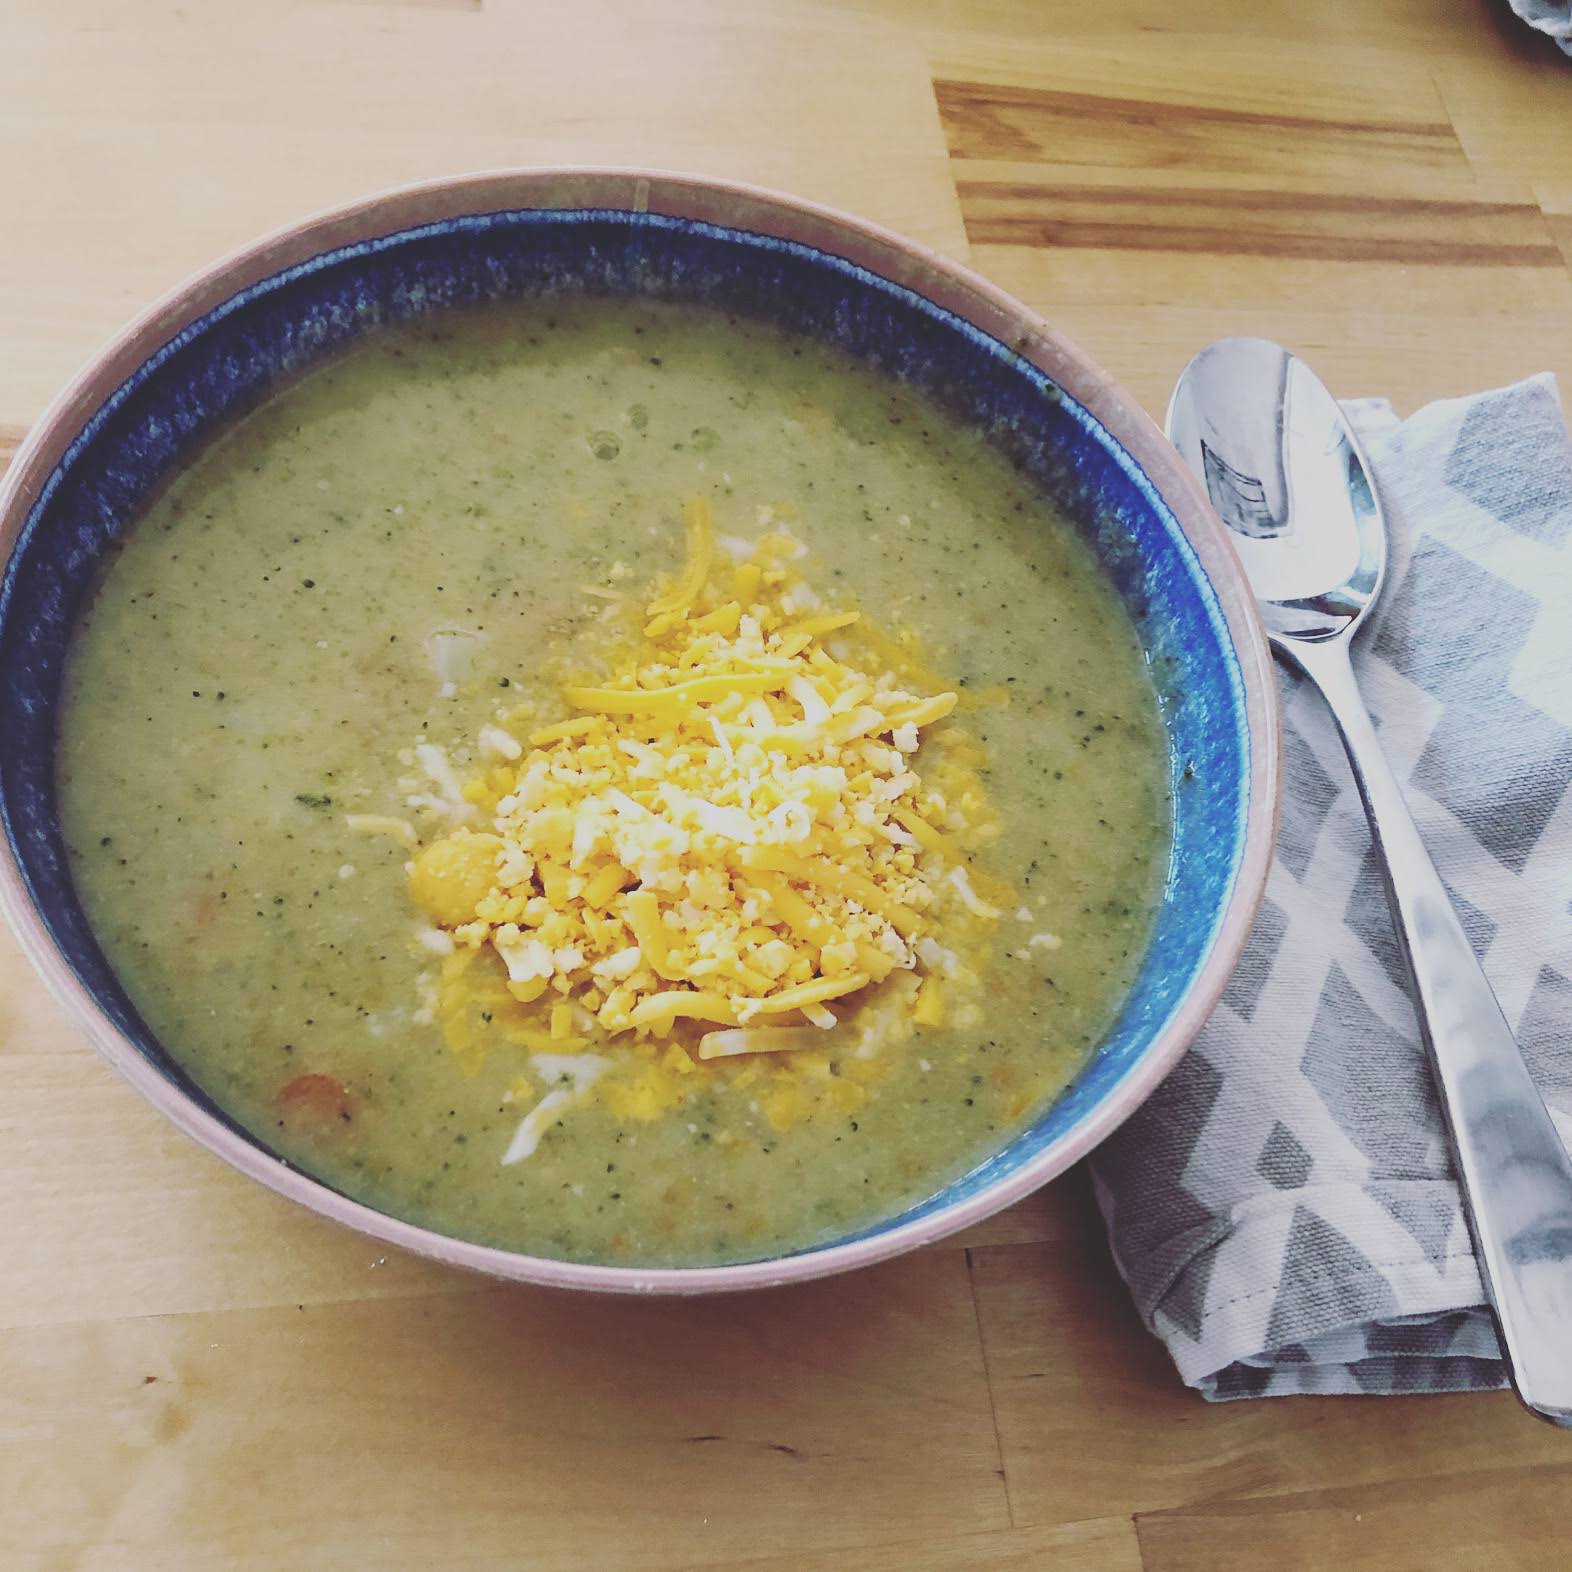 |
| Dairy Free Creamy Broccoli Cheese Soup |
 |
| Sauteed onions and garlic. |
 |
| Added carrots to the onions and garlic. |
 |
| Added broccoli. |
 |
| Stock and oat milk added to the pot. |
 |
| Soup blended using the immersion blender. |
 |
| I used a combination of cheddar and mozzarella for this recipe. |
 |
| Ready to serve! |
Subscribe to:
Posts (Atom)


